
1.Overview
WCFM allows you to configure membership levels for your multivendor store easily, before we step in to discuss about it’s configuration and settings, please ensure that your store has the WCFM Membership plugin installed and activated. With this, you can build unlimited membership levels with different pricing plans, commision, capabilities etc. Here’s a guide of how you can do it.
2.General Settings
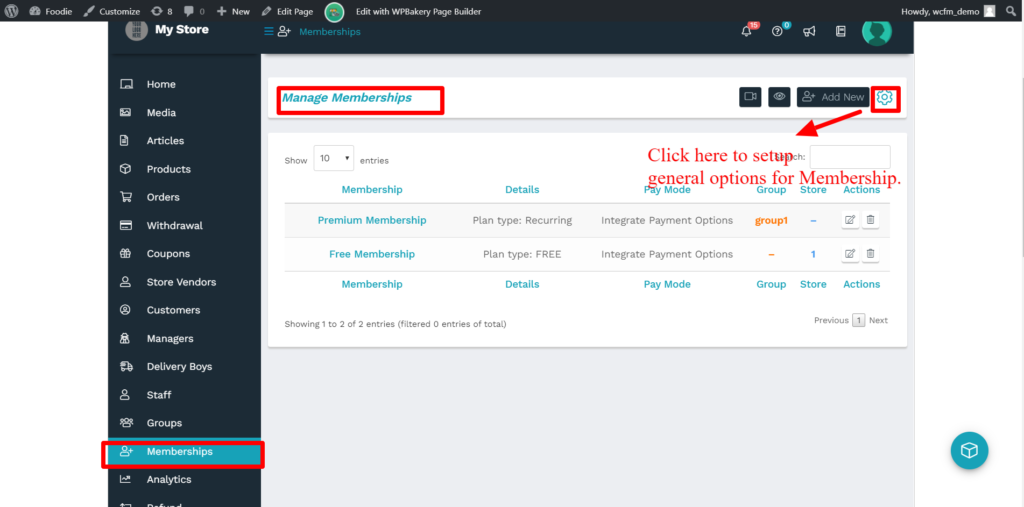
The general settings for membership can be configured by the admin from here: Goto WCFM Admin Dashboard -> Membership -> Click on Settings icon from Manage Membership page
Here’s a screenshot of the same for better understanding:
Upon clicking on the settings icon ( as shown above) you will be redirected to “Membership settings” page as shown below:
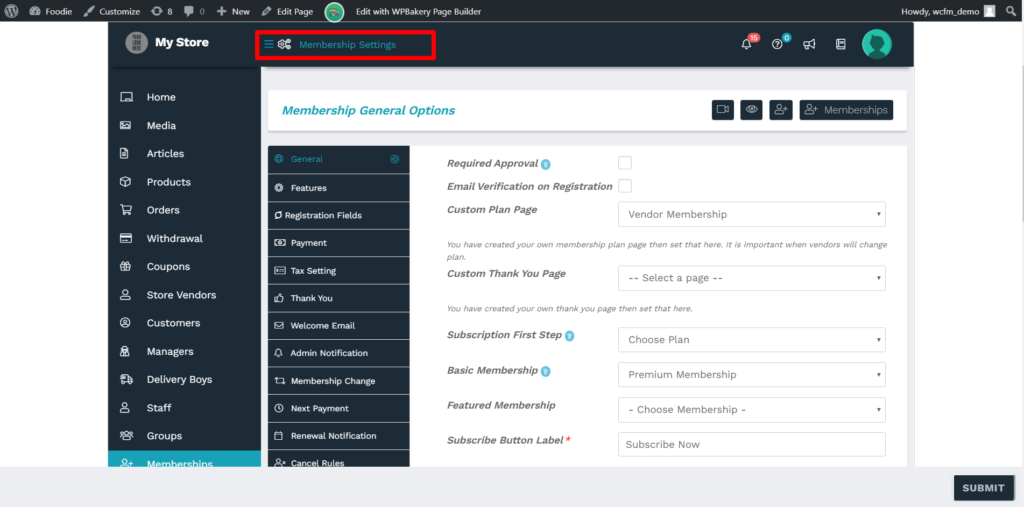
Let’s now discuss the options available for setting up membership levels one by one.
2.1.General Tab
This tab allows the admin to configure the basic rules for membership plans as shown below in the screen-grab:
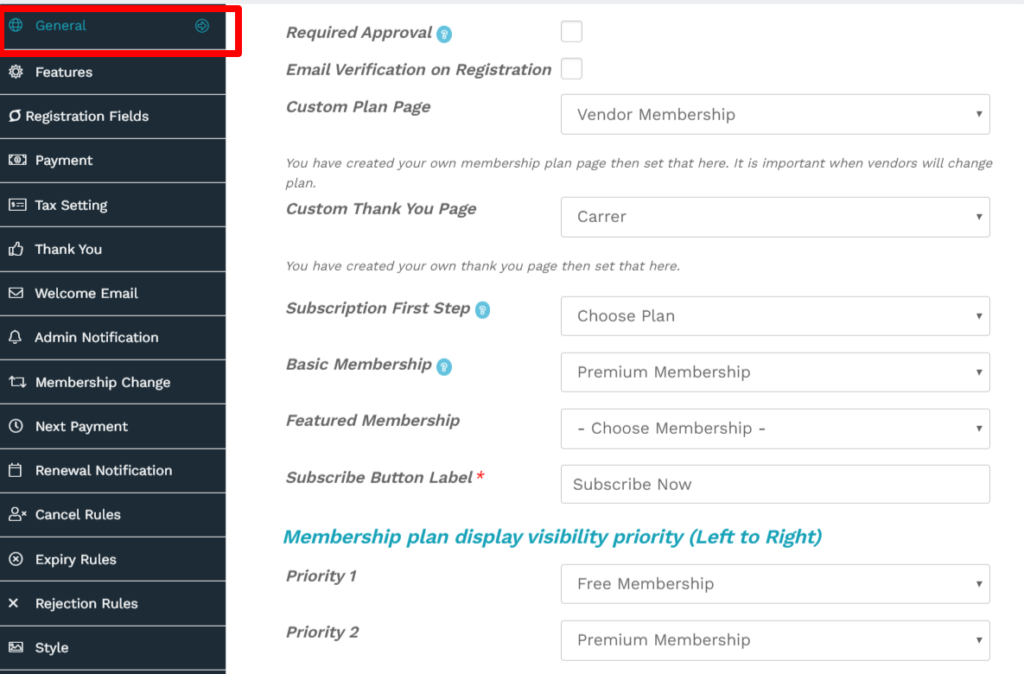
Here are the options which can be set here categorically:
Required Approval: Checking this will ensure that the vendors needs admin approval for becoming a vendor.
Email verification on Registration: Checking this will ensure that the vendors need to go through an email verification process to confirm their registration. This option will send a verification code to the mail which has to be entered for while subscribing for membership.
Custom Plan page: One can set the Plan page from the list of pages in the drop-down, thus incase admin has created a custom page, then it can be selected from here.
Custom Thank you page: Incase the admin has developed a custom Thank you page, it can be set from here using the available drop-down. This page will be displayed after completion of membership subscription.
Subscription First Step: This will allow the admin to choose the first step of the membership subscription. You can either keep Registration as first step ( where users will be asked to enter details such as name, email etc) OR plan selection page ( where users can select membership plans).
Basic membership: The admin can choose the membership plan which will be auto-assigned to the vendors if their subscription has expired or recurring subscription is cancelled.
Priority: You can set from here the priority of display for the membership plans ( from left to right) using the dropdown options for each priority level.
2.2.Features Tab
Membership feature list is very important as membership levels will be created on the basis of these items. You may create any number of features for membership plan from here such as Product Limit, category Limit etc.
Here’s an example how it’s set:
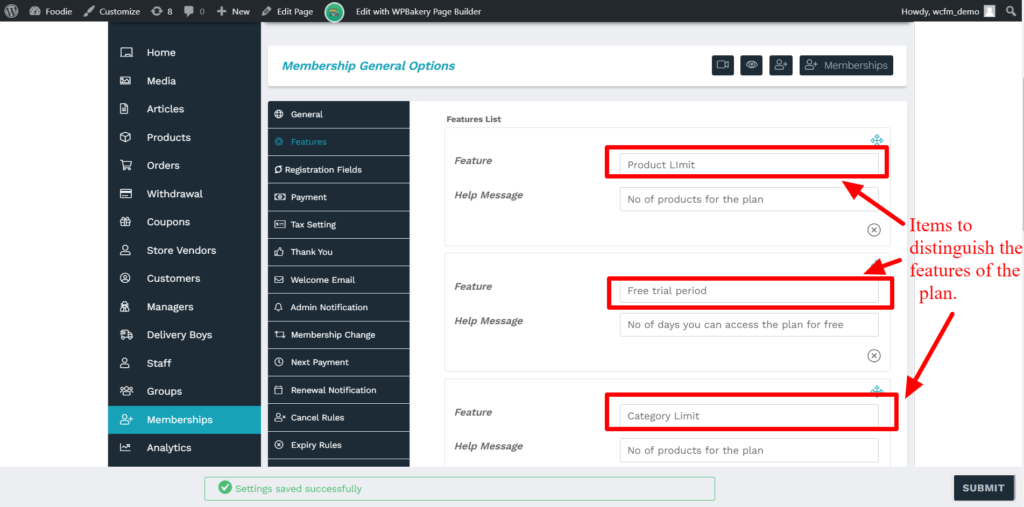
You will be able to see these features to edit/add membership page like shown below where you will have to enter the parameters against these.
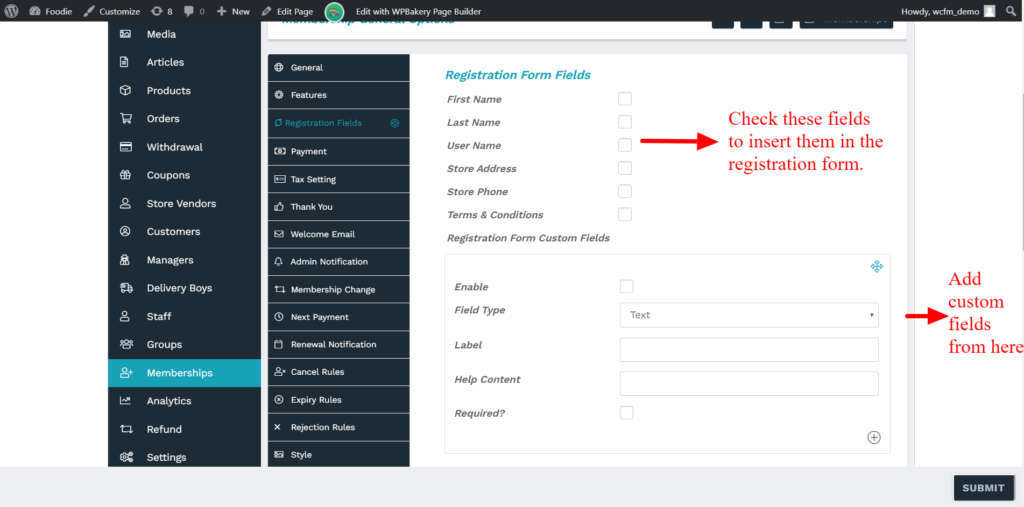
2.3.Registration Fields Tab
From here the admin can set the fields of the registration form which has to be filled by vendors for subscribing to the site. You will have to check the field items which you want to show in the registration form ( such as first name, last name etc), additionally, you can add custom fields to be inserted in the form as well as shown below:
Pic 1: Showing the fields for registration.
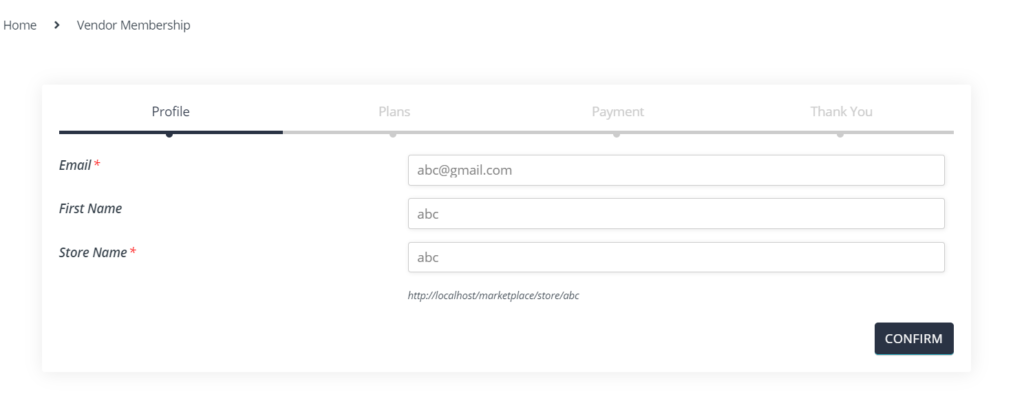
Pic 2: Front-end representation of the registration form ( only First name is enabled)
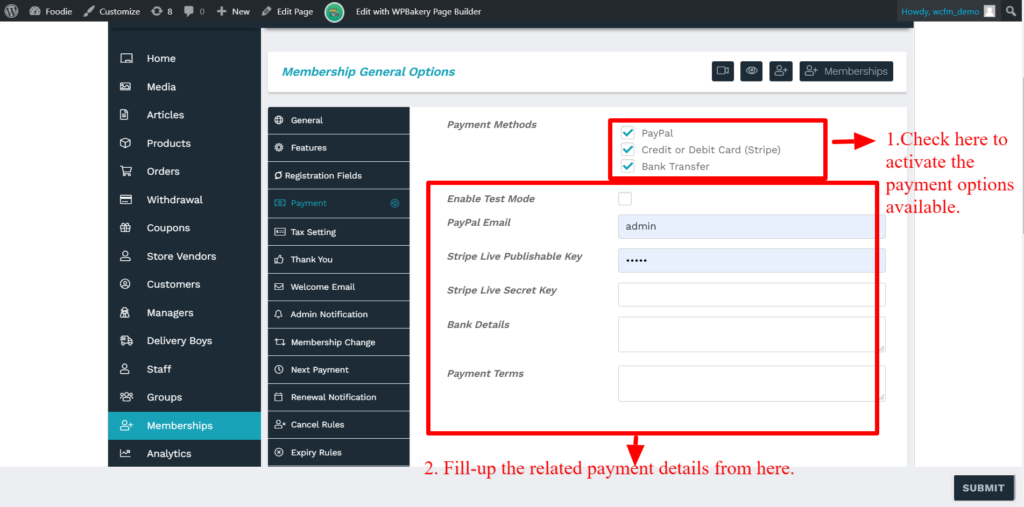
2.4.Payment Tab
WCFM supports Paypal, Stripe and bank transfer as of now, and the admin can enter their bank details here where the subscription amount ( paid by the vendors/members) will be credited. As shown in the screenshot below.
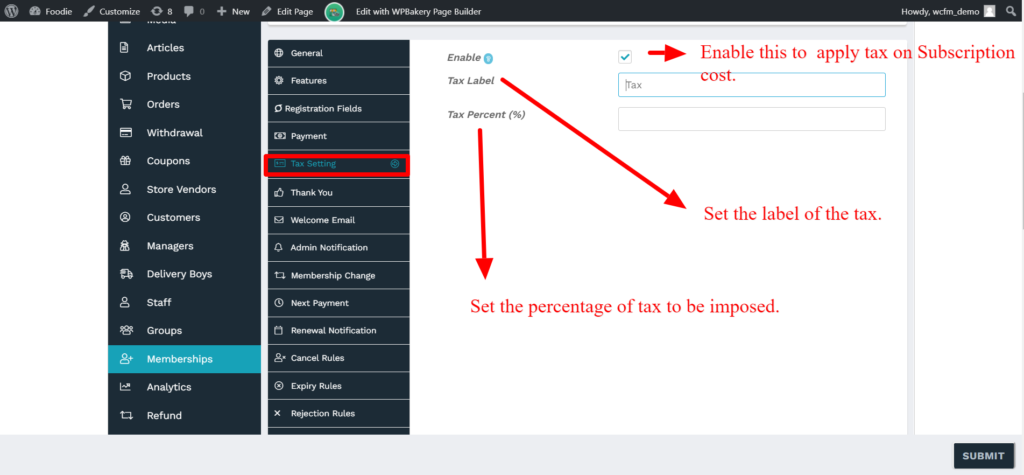
2.5.Tax Setting Tab
Many countries have taxes imposed in their business and as an admin you might want to pass this burden to your vendors who are registering to your site. This section allows you to set the relevant taxes ( such as VAT, GST etc). Here’s again a screen-grab for better explanation.
2.6.Thank you Tab
his section allows the admin to place the content of the email which will be triggered once the vendor(s) applies for subscription in the site. Note that you do not need to provide the Dashboard Url in the mail content as it will be automatically appended in the mail.

PS: The “ On approval mail content” is only applicable if the user requires admin permission to become a vendor.
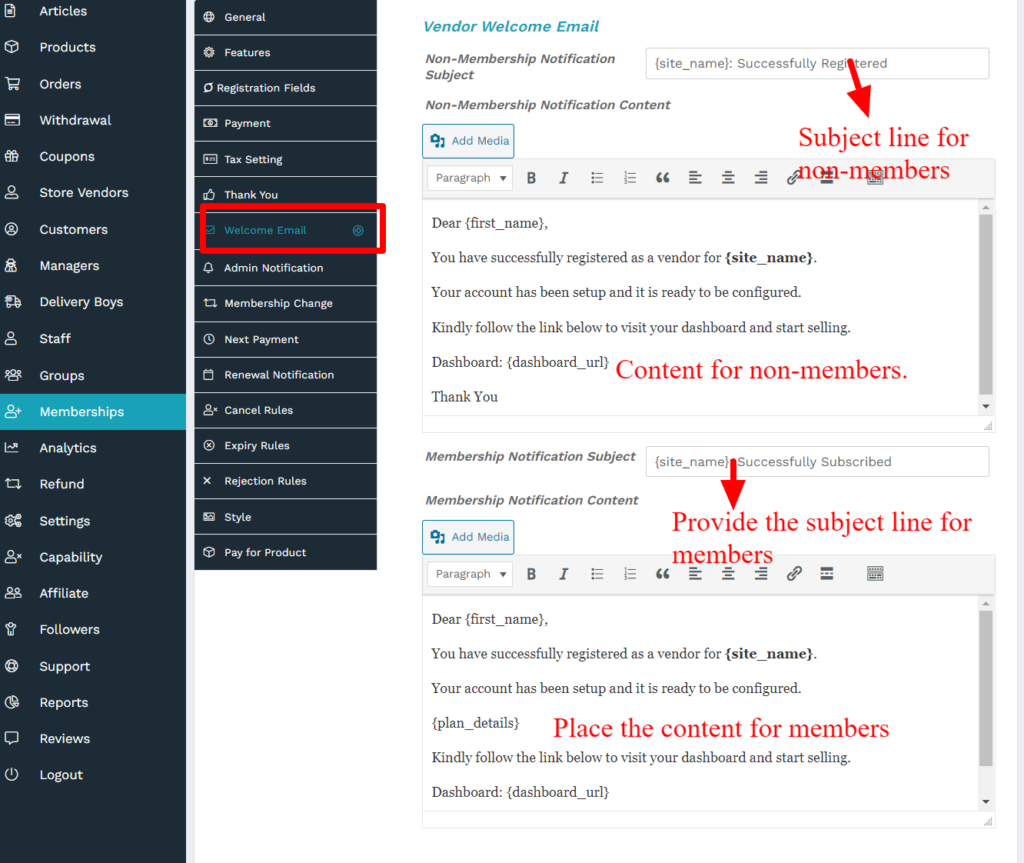
2.7.Welcome Email Tab
From here the admin will be able to configure welcome email for users, here you can set the content and the subject of the mail for both who are applying for membership plan, and for those who are just opting for being a general vendor and not purchasing any plan. Following screenshot will give you a better insight.
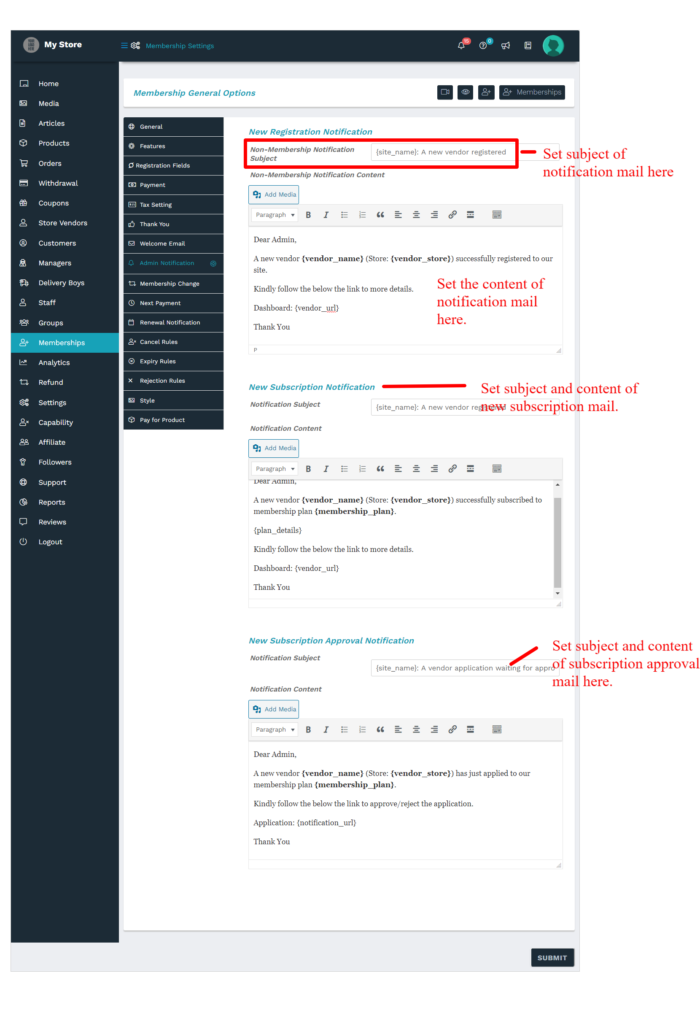
2.8.Admin Notification
Admin will receive email notification on new subscription and pending approval request. This section will allow you to manage admin email content of the admin’s mail from here. You will be able to configure the content of new subscription mails, approval mails and notification mail from here.
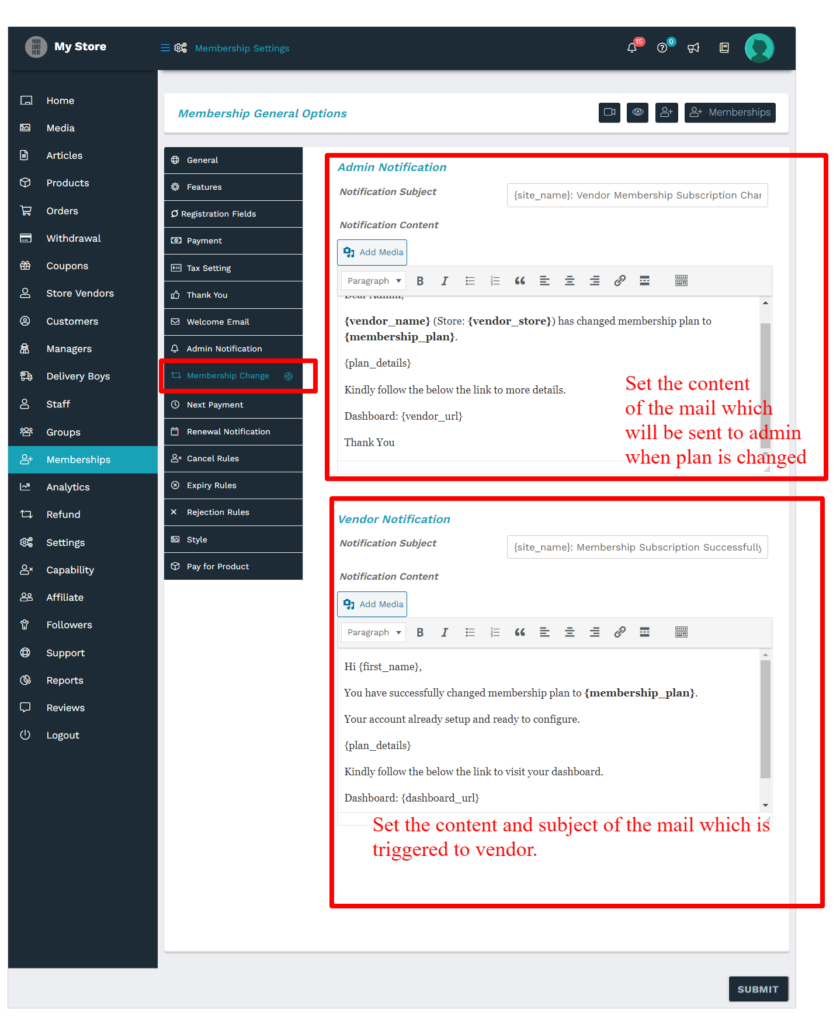
2.9.Membership change
Here the admin can set the content of the mail which will be triggered if a user changes his/her membership plan. You can set the content of both the mails which will be triggered to the vendor and admin when the plan of a vendor gets changed.
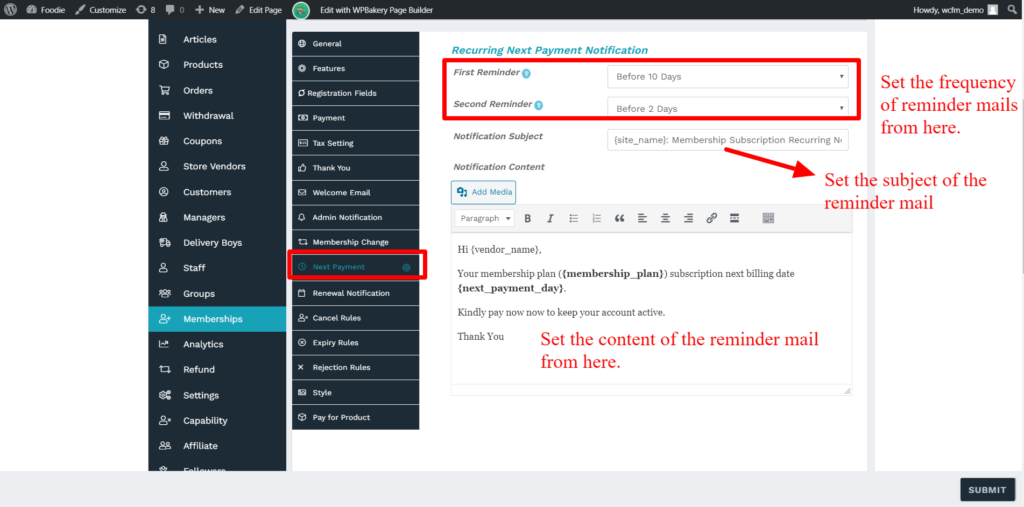
2.10.Next Payment
This section allows the admin to set the frequency of the reminder mails for recurring subscription payment. Additionally, the content of the reminder mails can also be set from here.
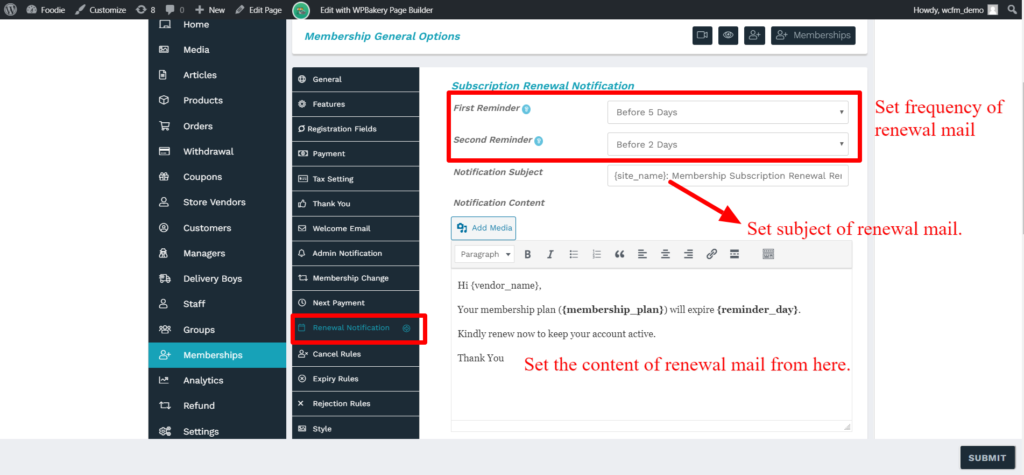
2.11.Renewal notification
This section allows the admin to set the frequency of the reminder mails for renewal of subscription. Additionally, one can also set the content of renewal mail from here.
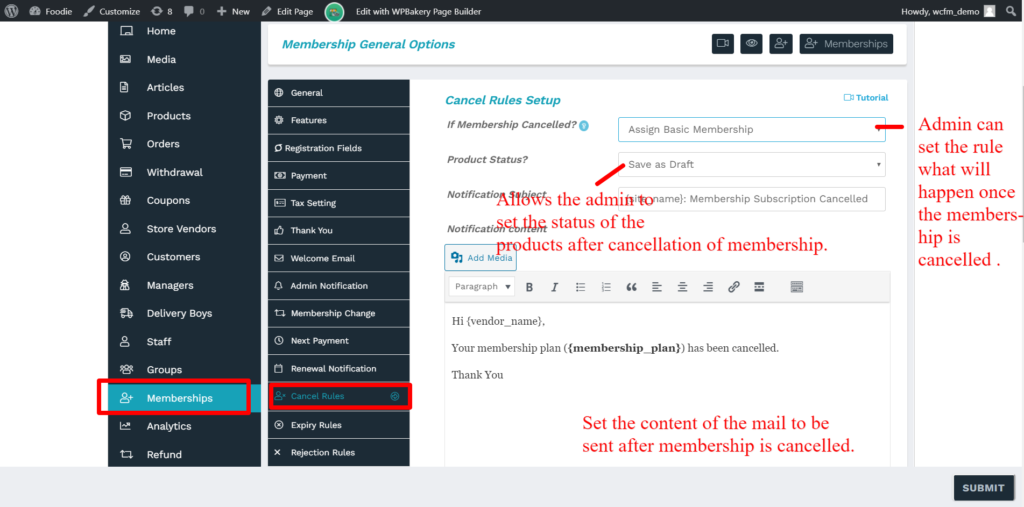
2.12.Cancel rules
This section gives the admin the ability to setup the rules if a membership is cancelled. Here, you can set the status of the cancelled membership, the mail sent for membership cancellation etc. Here’s a briefing of the section here:
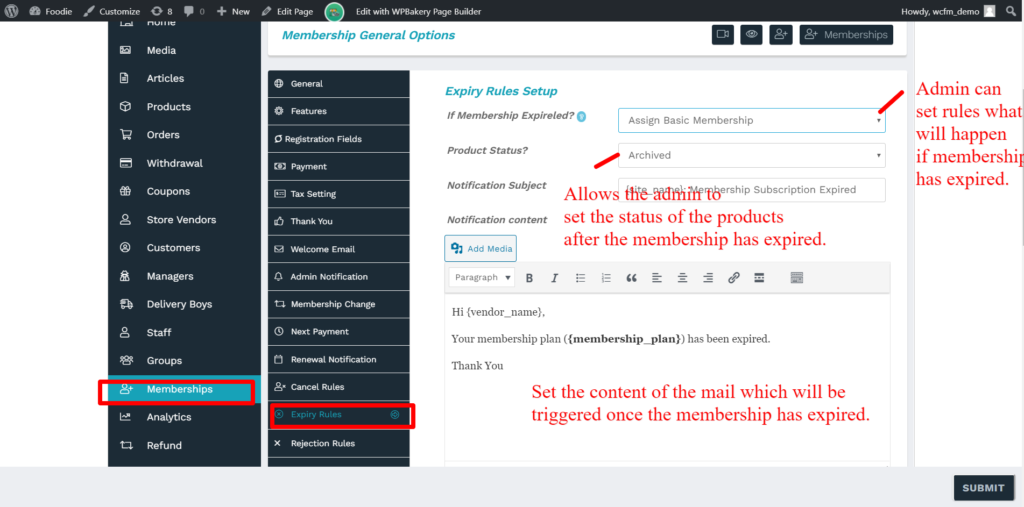
2.13.Expiry Rules
Similar to cancellation rules, admin is allowed to set the rules if a membership has expired. Here one can set what will happen once the membership plan has expired, the status of its products and also the content of the mail which will be triggered after expiry, here’s a screenshot for better understanding.
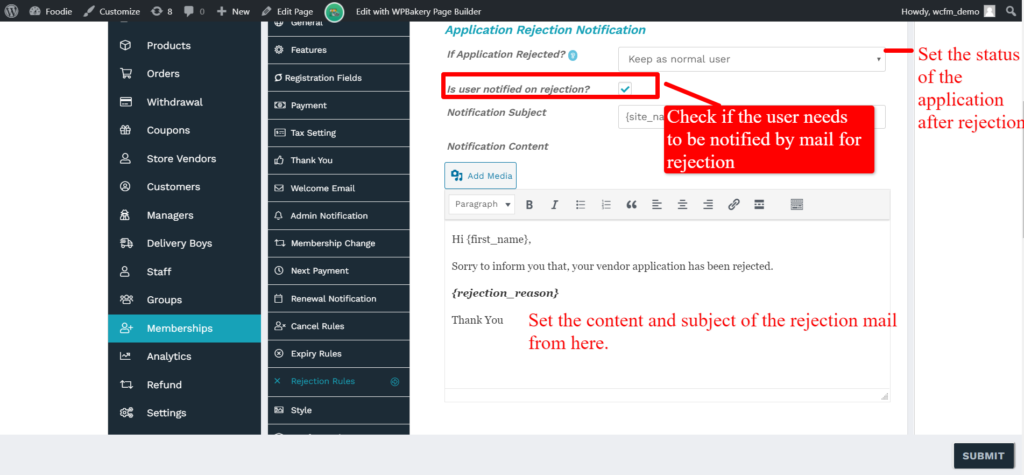
2.14.Rejection rule
Admin can also set and configure the rules for rejecting memberships from this settings tab. From here the admin can set what will happen once a membership is rejected, and if the user will get notified for the same, additionally the admin will also be able to set the content of the rejection mail from here.
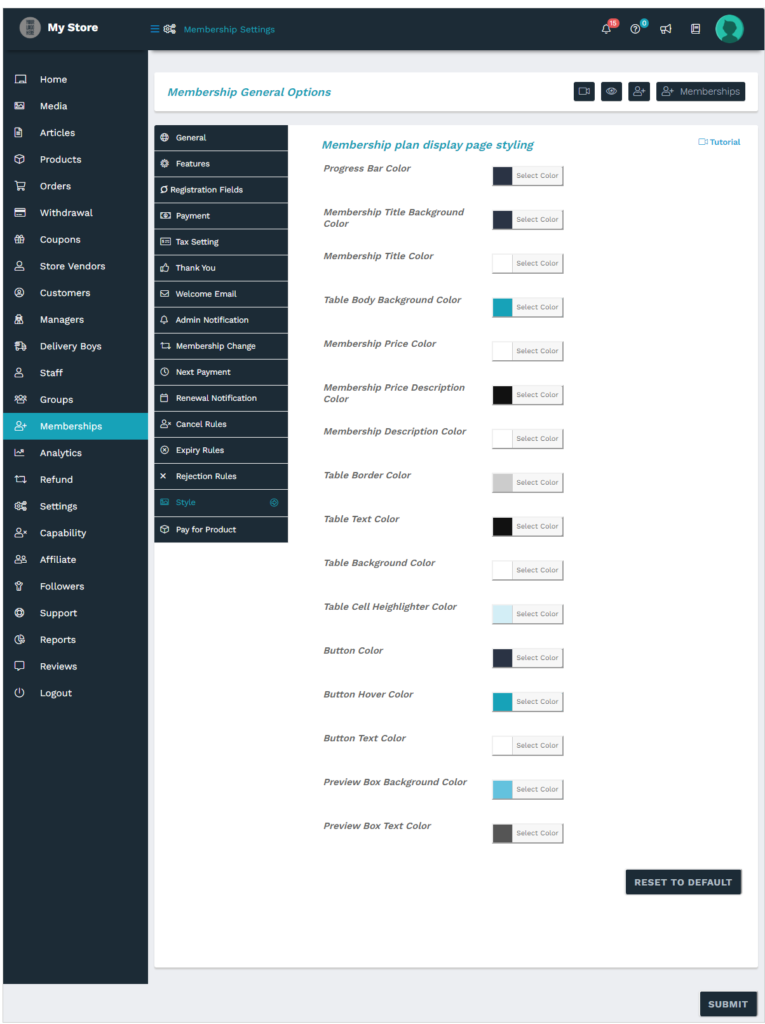
2.15.Style
From here you will have the full flexibility of styling your membership page to match with your site’s template.
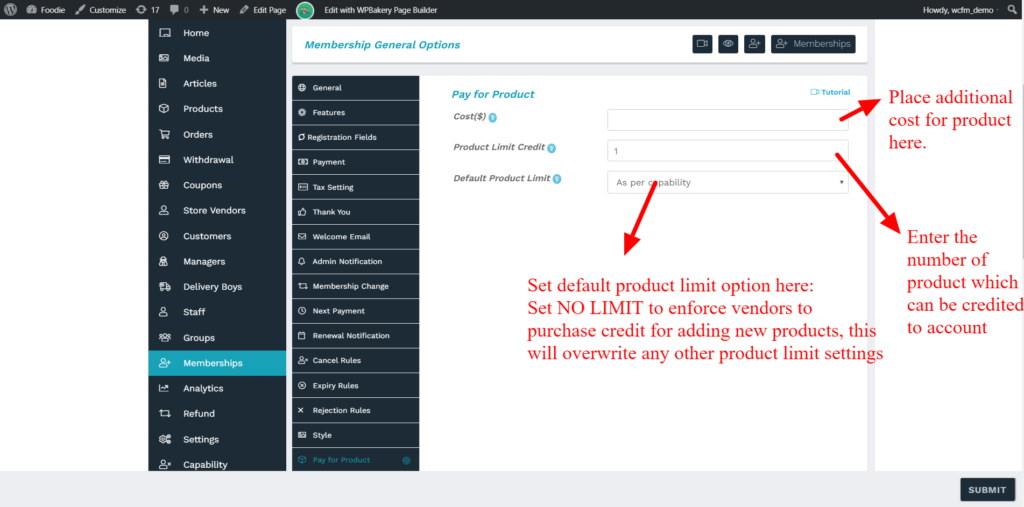
2.16.Pay for product
The pay for product feature will allow a member/vendor to pay for an additional number of product(s) if he/she is exceeding more than the prescribed product limit in their plan. So for example, if the purchased plan allows a vendor to publish 10 products, and if he/she needs to publish 1 product more, then this feature will allow them to pay for this extra product. Here’s a screenshot for explanation and a video tutorial as well.
3.Adding or Editing membership
Here’s a guild-line to create a membership plan along with a short description of the options available.
To start with Goto WCFM Admin settings -> Membership -> Add New ( as shown below)
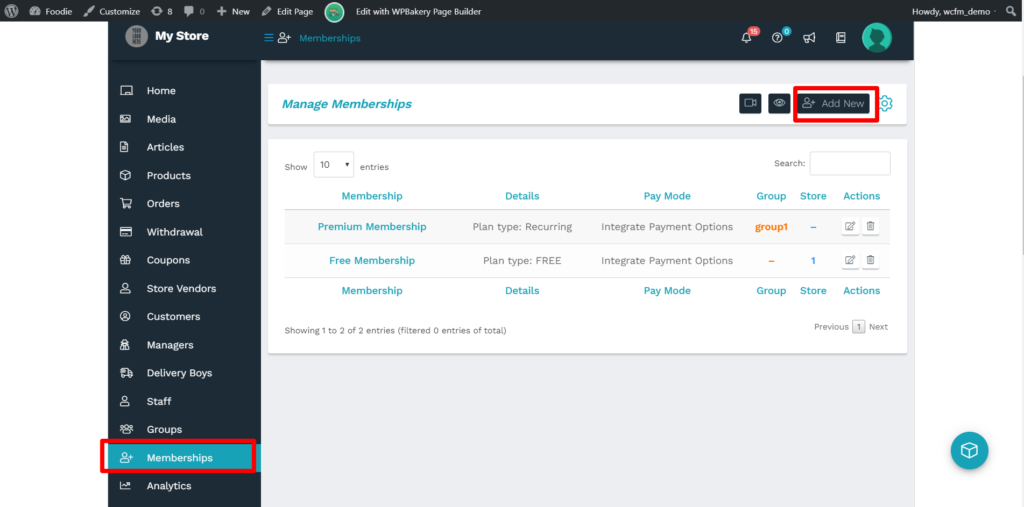
Once clicked, you will be redirected to “Add new” page with various options to configure the membership plan, here’s a glimpse of the page for adding membership.
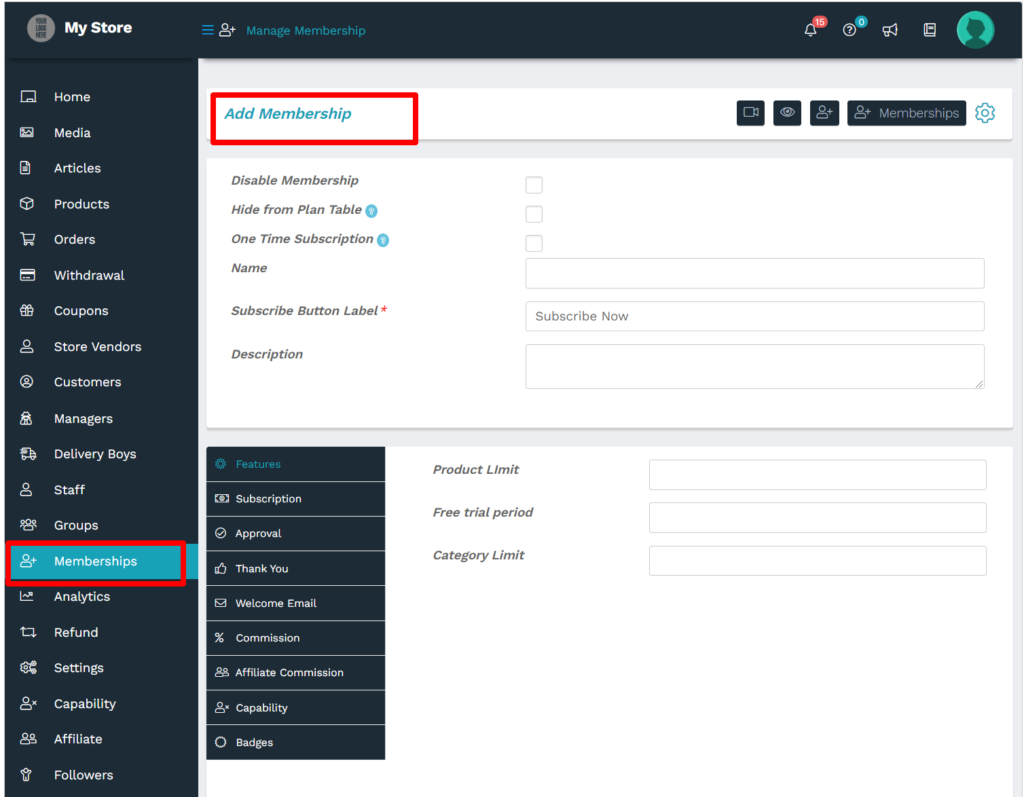
Moving ahead let’s discuss the options available here Sequentially:
Disable Membership: Check this to disable the membership plan from your store.

PS: This option is useful if one wants to discontinue a membership plan from a running store.
Hide from Plan table: Enable this option to hide this membership plan from being shown in the membership table.
![]()
One time subscription: Enable this to ensure that an individual person is not able to apply for this plan more than once.
![]()
Name: Admin can enter the name of the plan here.

Subscribe Button Label: Admin can set the text on the subscription button from here:

Description: Here you can add the description for the membership plan.

Subscribe button configuration ( for edit only) :While editing an existing membership plan, you can configure the subscribe button by the following option below:
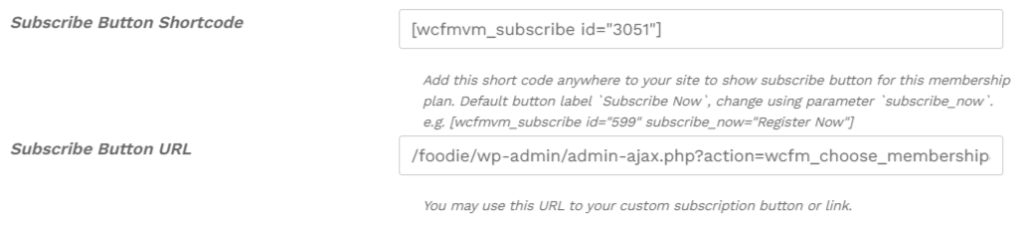
Using the above options you can add the provided short code anywhere to your site to show “subscribe button” for this membership plan. You can also place URL to your custom subscription button or link.
Following the above basic information, the admin can move into the settings panel provided to configure the plan, please note that these settings will overwrite the general/default rules set from the settings menu discussed above.
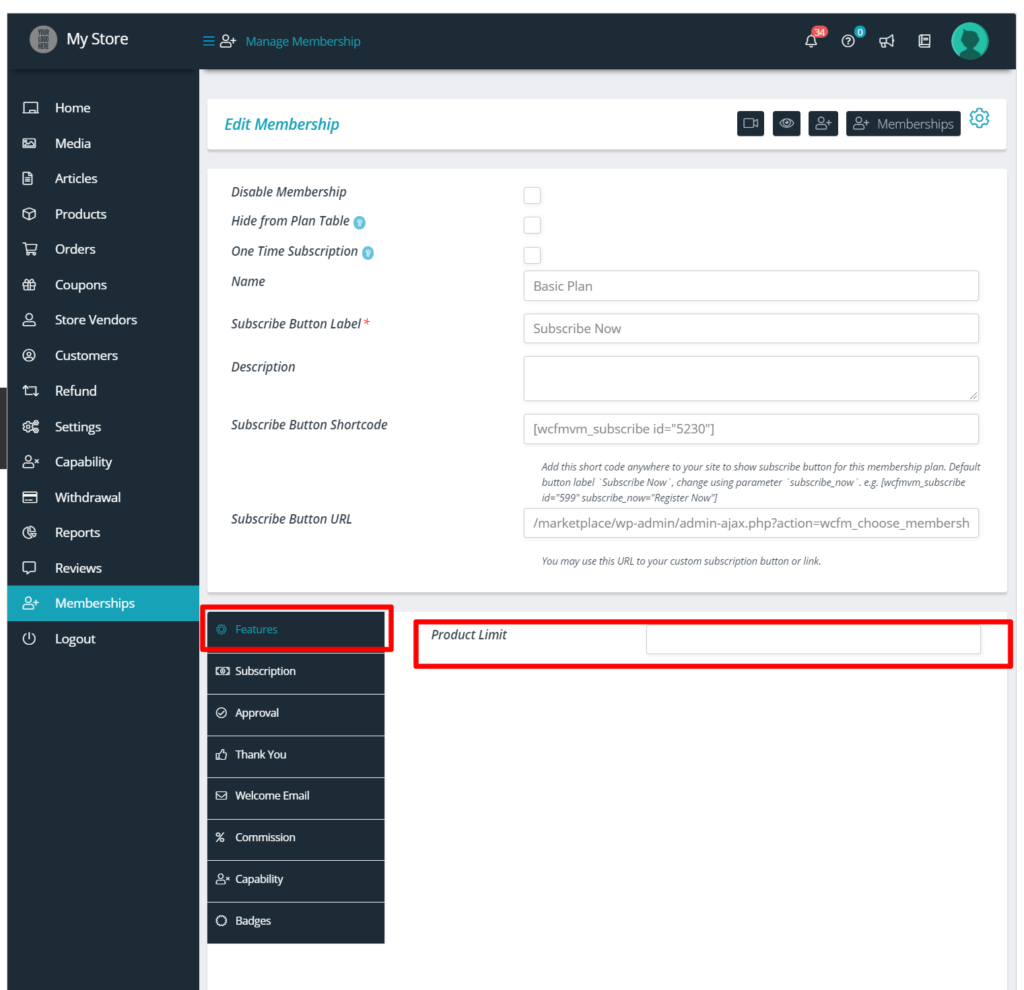
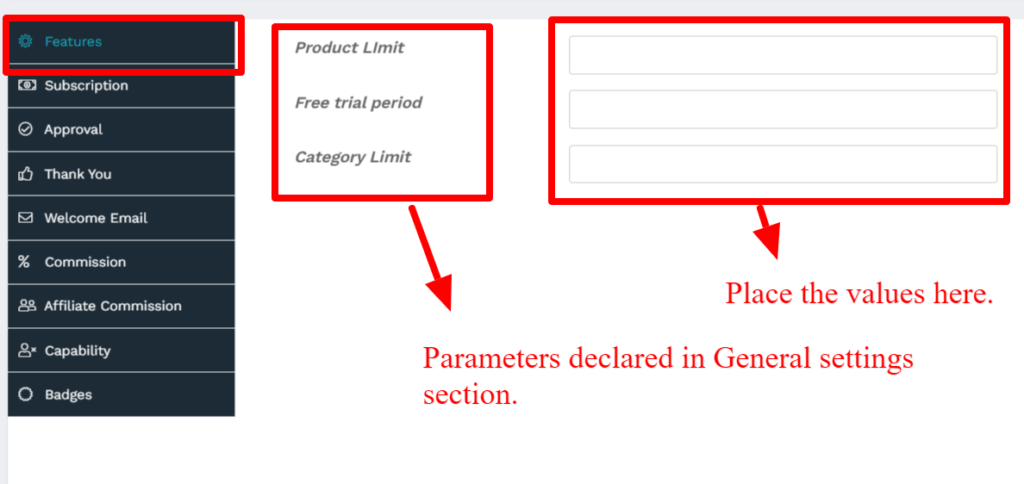
3.1.Features
From here you can enter the values for the features declared in general settings sections. Here’s an example of the values being placed:
3.2.Subscription
This serves are the most important part of membership plan as it defines are payment rules, there are a number of options available here which gives the admin required flexibility for setting up a perfect plan, here’s a screenshot of the same:
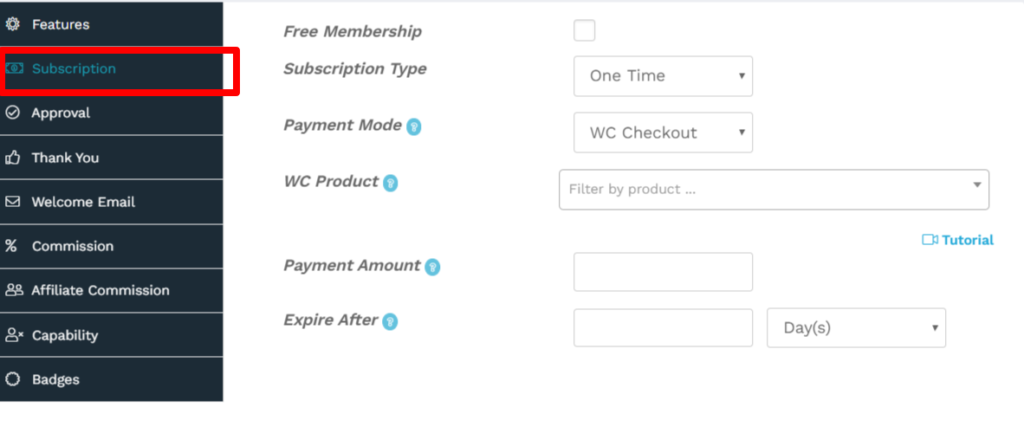
Let’s discuss the options available for this purpose:
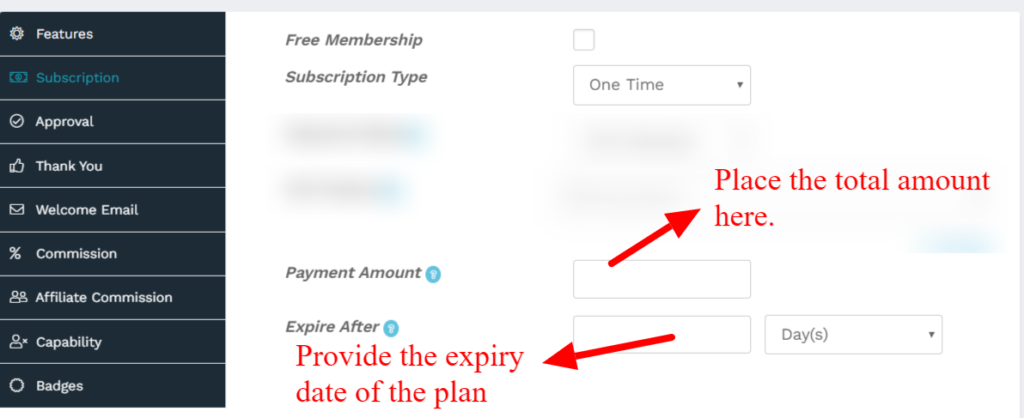
a. Free Membership: Enable this option if you want the plan to be free.
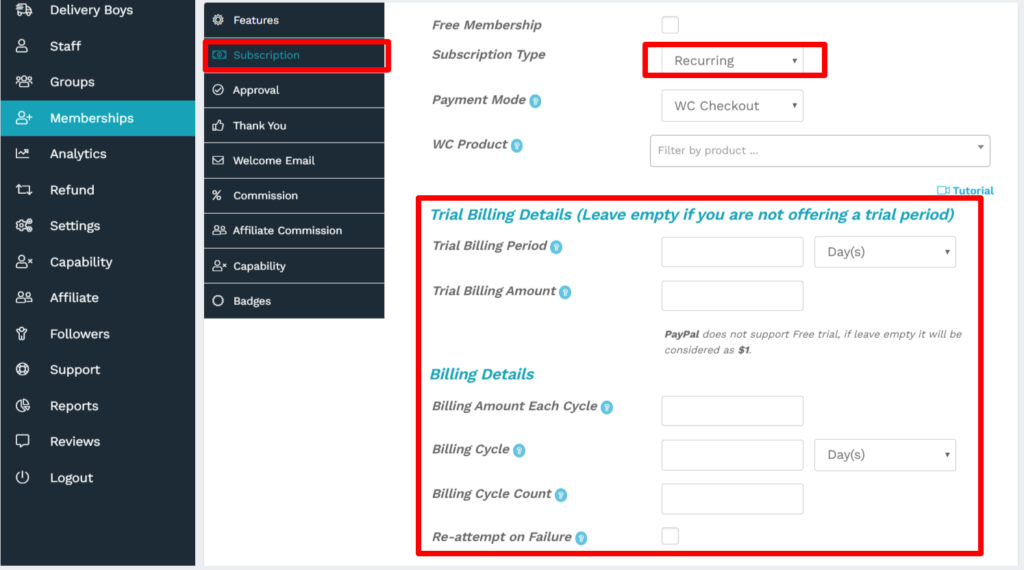
b. Subscription type: You can select the type of subscription from here, there are 2 types of options available, here they are:
i) One time subscription: Here the payment for the plan is only for one time and the admin can set the amount along with the expiry date for the same.
ii) Recurring payment: For recurring payment, the admin will be prompted to enter billing amount, details, billing cycle ( in days). Also if you are offering the trial period, then you can also enter the trial period’s time and amount as shown below in the screenshot.
c. Payment mode: You can choose your payment mode from here WC checkout or integrate payments.

Incase you select WC checkout then it will allow to process the payments using WooCommerce default checkout pages, all WooCommerce payment gateways are supported here and for this you will need to map a simple subscription product ( as a membership plan) as in this tutorial here. Following screenshots shows creating a simple subscription product and mapping.
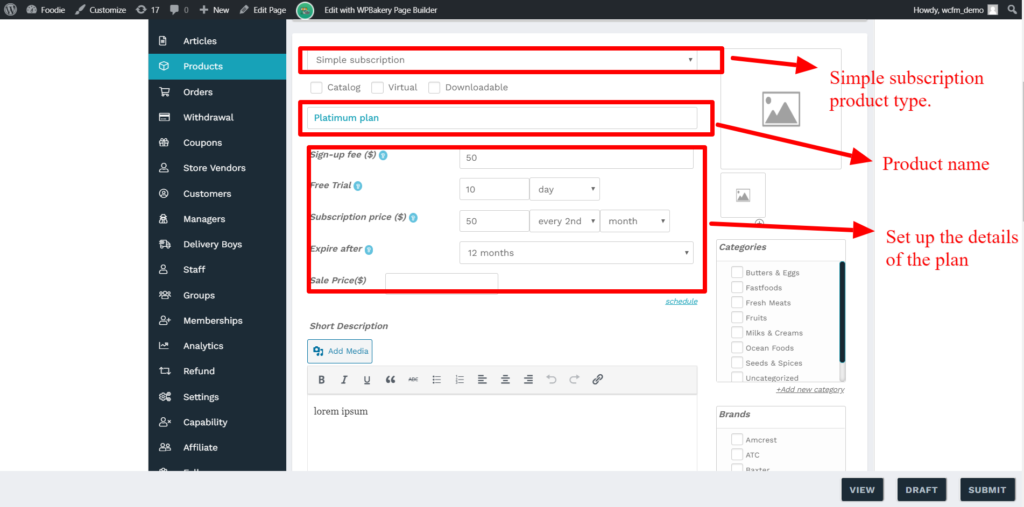
Pic 1: Showing the subscription product.
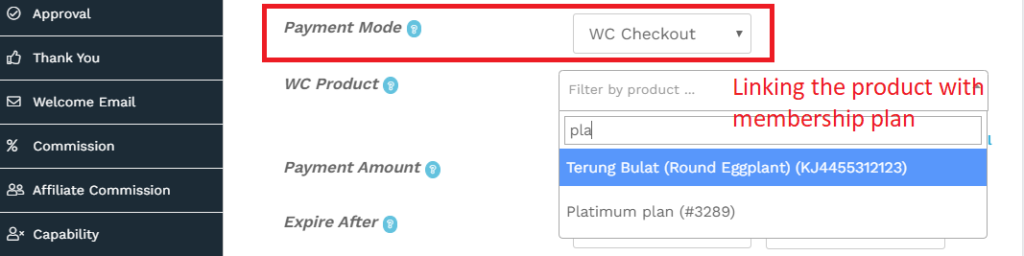
2. WC checkout option allows you to search for a subscription product for linking it to the membership plan.
The above will ensure that the declared payment mode for WooCommerce produc can be used for this membership as well.
Similarly, if you choose integrate payment solution, then it will only allow the payment system declared in the General settings of membership [ Which was set from WCFM Admin Dashboard->Membership-> Settings -> payments].
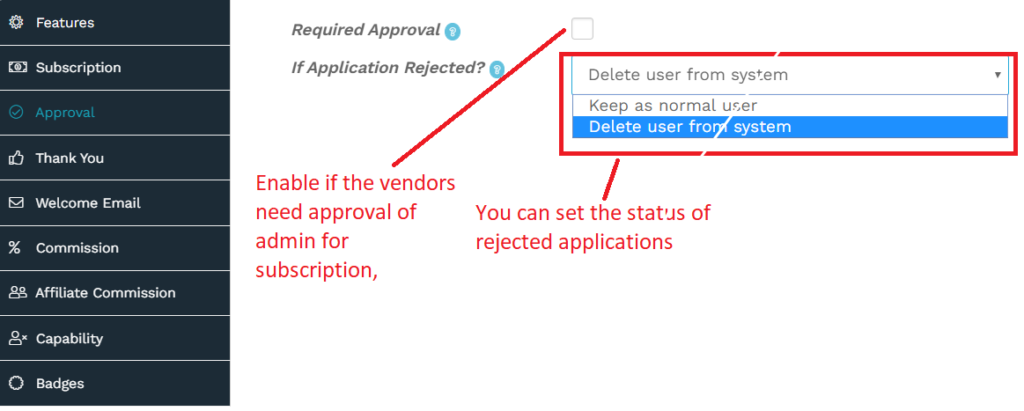
3.3.Approval
From this settings you can set if the vendor requires approval of the admin for becoming a vendor. Additionally, you can set the status of the rejected vendor from here as well.
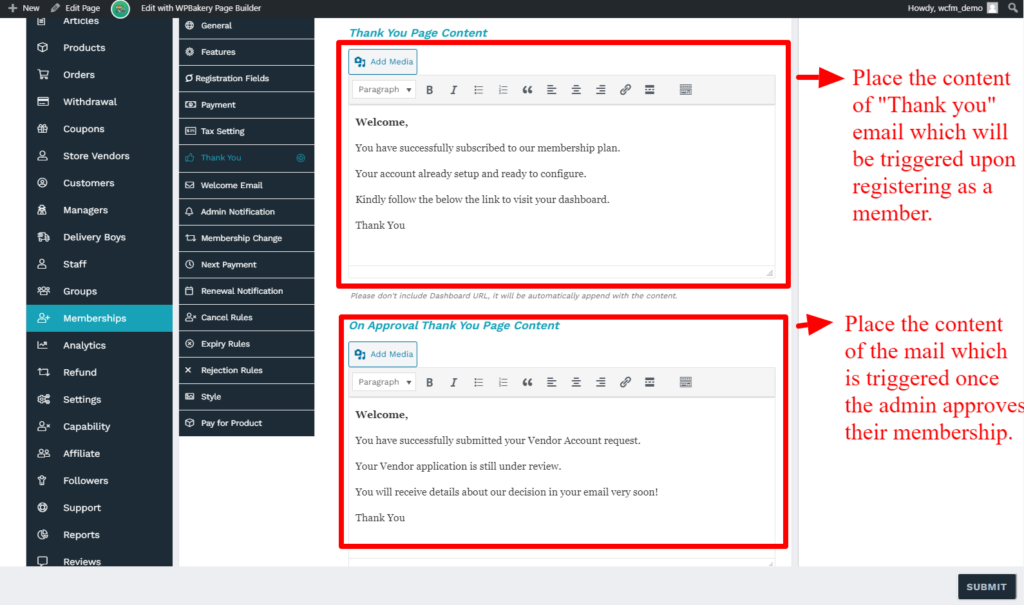
3.4.Thank You
This settings will allow the admin to set the content of the Thank you page, please note that it’s not required to enter the dashboard url as it will be automatically appended in the mail. It contains two sections, one for the default Thank You mail, and other for the thank you mail after approval
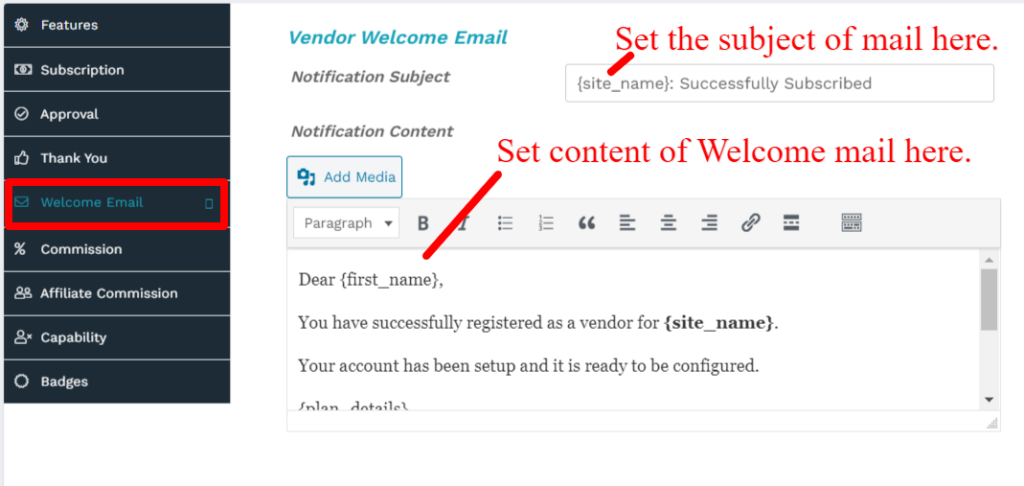
3.5.Welcome Email
Admin also will have the ability to set the email email which will greet the new users in their site. Here’s how you can configure it.
3.6.Commission
With WCFM you are able to set different commissions for different membership plans. For each plan, you can configure a different set of rules. Here’s a snap of the settings as well:

Note that the “Commision for” option will reflect the same value as set in the global settings here – Admin Dashboard-> Settings-> Commision Settings
You will have to set “Commission mode” and following are the options which will allow you to configure the rules accordingly.
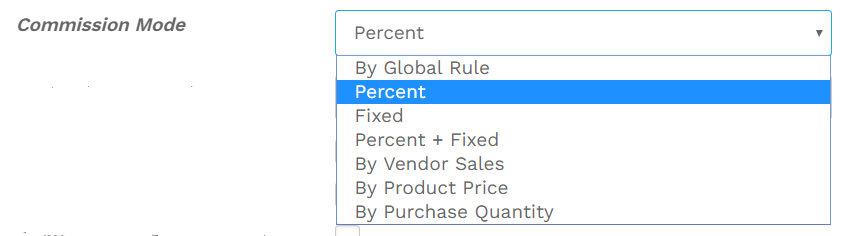
Incase you set the mode as “by global rule” then all the default rule set in the default settings pf commision settings will be applicable here. Incase you want to set specific rules for this particular membership plan then you can use options like Percent, fixed, Vendor sales etc. These settings are similar to that which you will get in commision settings and can check the documentation here.
3.7.Affiliate commission
Apart from setting up the commission for vendor, WCFM also provides similar feasibility to setup commission for the affiliate members as well. Here’s a glimpse of the setup here:
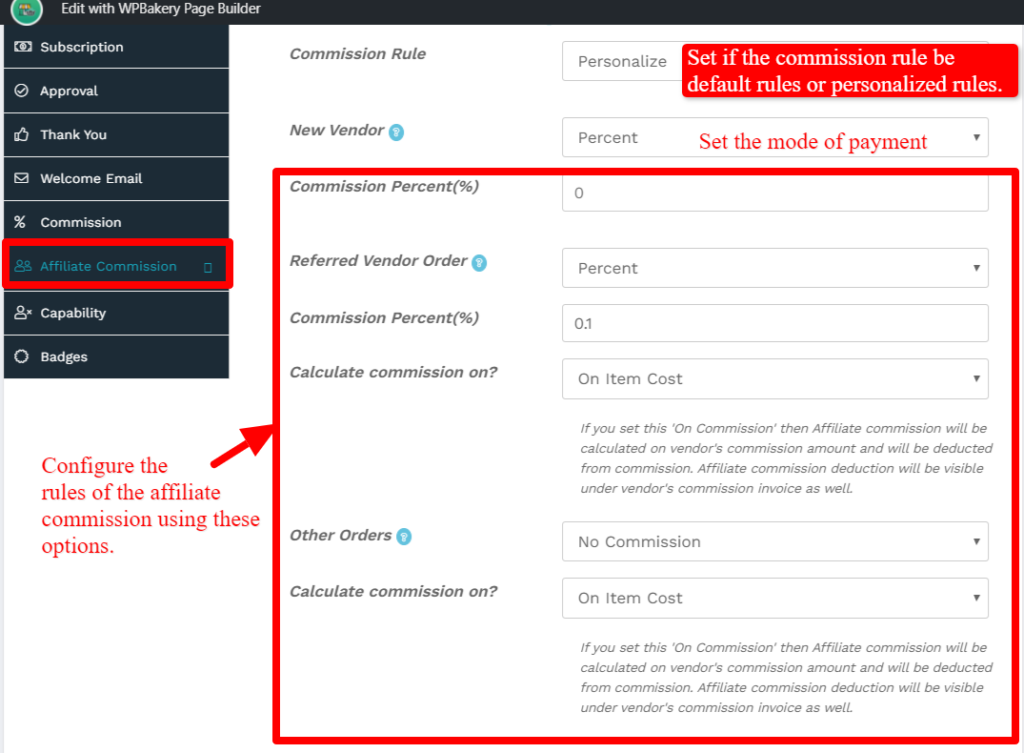
Note that these settings are same as the options provided in affiliate settings, and for reference you can checkout this documentation here
3.8.Capability
You can assign capability to this membership plan by mapping it to related group from the drop-down provided. Here’s a screenshot of the same.
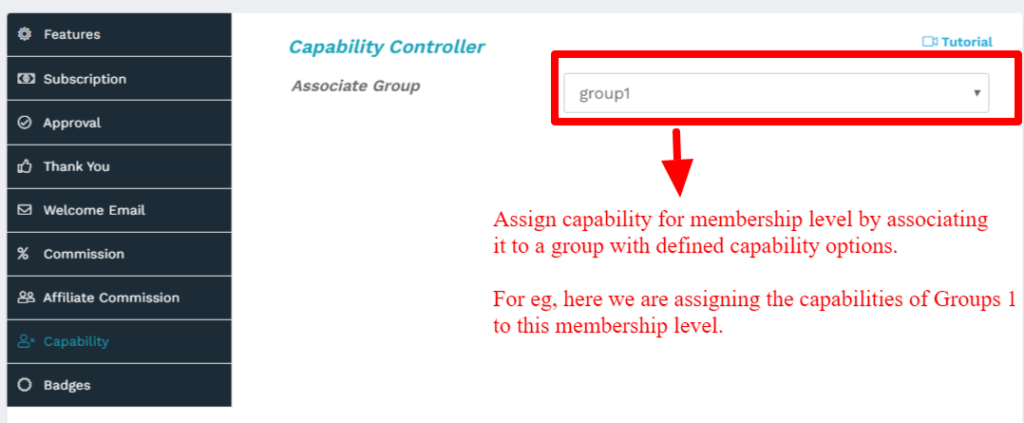
Note: This option is available with WCFM Ultimate.
3.9.Badges
You can also set badges for every membership level. Note that you can set the badges from Settings -> Store Badges section, and these can be assigned to the membership from here:
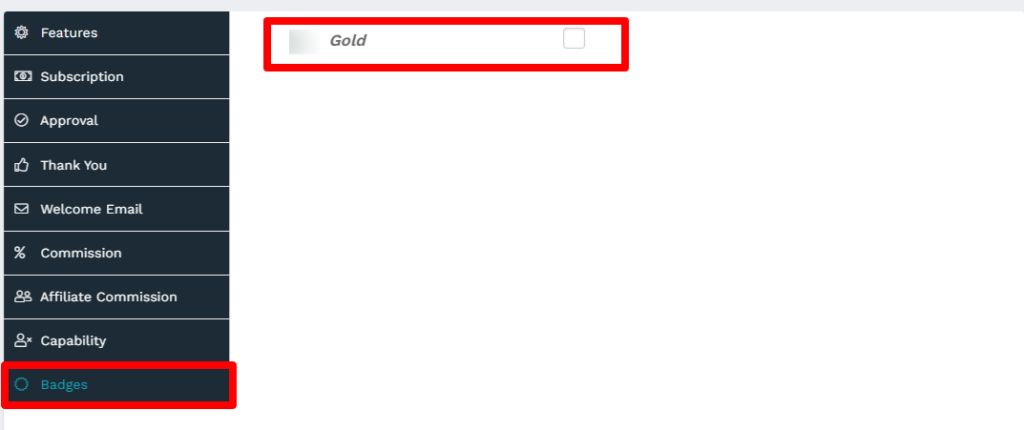 ( eg :check the box to assign gold badge to this membership)
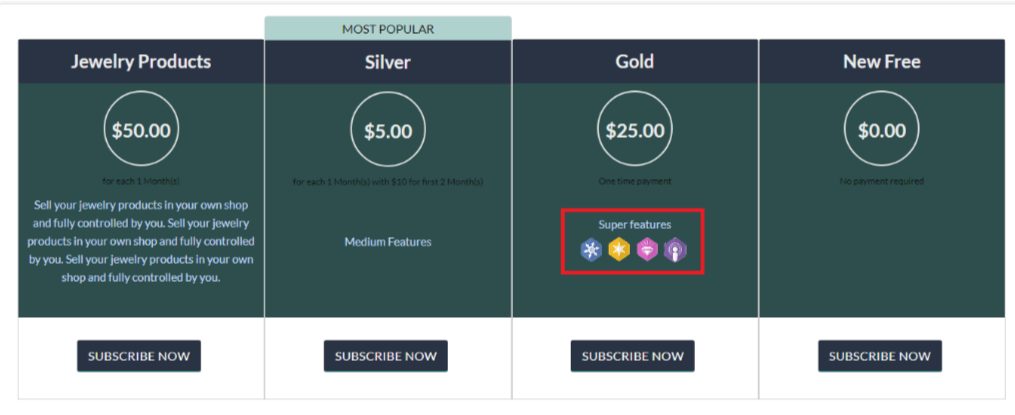
Here’s an example showing how the badges are shown:
 Once all the settings are configured, click on Submit button to save the changes.
Note: This option is available for WCFM Ultimate
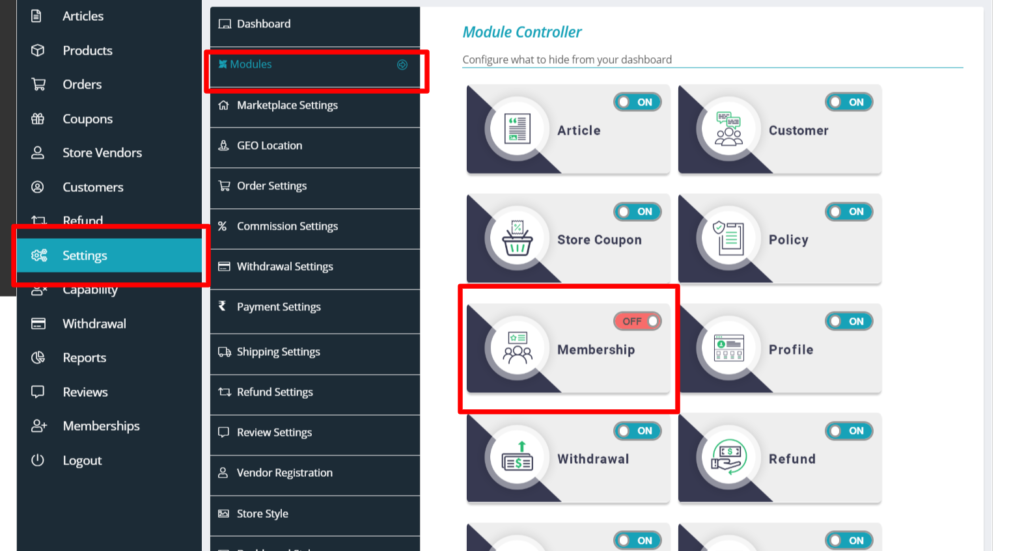
4.Disabling Membership
To disable the entire membership module from your online store, you will have to Goto WCFM Admin Dashboard -> Settings -> Modules -> Turn off Membership
You will not see any membership section in your site if you turn OFF this entire module, the vendors can then opt for simple vendor registration and get listed to your site. For information regarding simple vendor registration click here