
1.Payment Overview
Vendor payment gateways are most essential component for vendor commission payout. Vendors are allowed to withdrawal their commission via these payment options.
Vendor payment options –
- PayPal
- Stripe
- Stripe Split Pay
- Skrill
- Bank Transfer
- Cash Pay
You may setup this from WCFM Admin Setting -> Payment Setting Tab
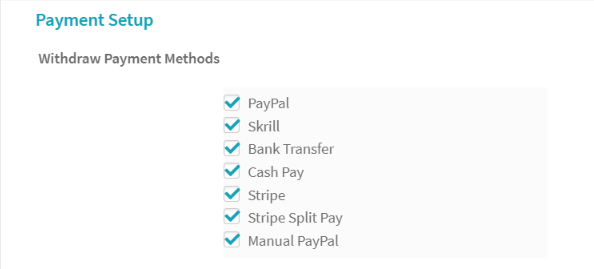
Admin may enable any of these payment options, and Vendor may set any of these as their preferred withdrawal payment method.
2.Electronic Payment Methods
Electronic payment options are allowed you to transfer payment from Admin account to vendors’ account via online transfer (using API)
Electronic payment options –
- PayPal
- Stripe
- Stripe Split Pay
2.1.PayPal
Enable PayPal from payment list and hence you will see PayPal configuration fields –
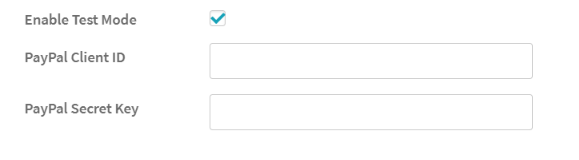 You may enable “Test Mode” for testing purpose.
2.1.1.PayPal Account Setup
Read this know how you may get PayPal client ID and Secret Key – https://www.appinvoice.com/en/s/documentation/how-to-get-paypal-client-id-and-secret-key
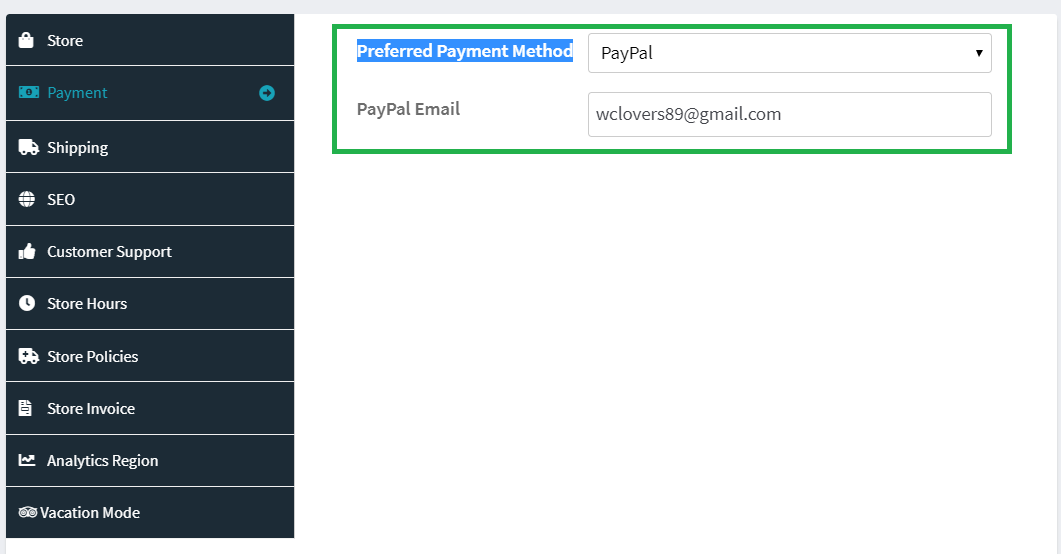
2.1.2.Vendor PayPal Connect
Vendors will have PayPal account connect option at their Store Manager -> Setting -> Payment -> Preferred Payment Method
2.2.Stripe
Enable Stripe from payment list and hence you will see Stripe configuration fields –
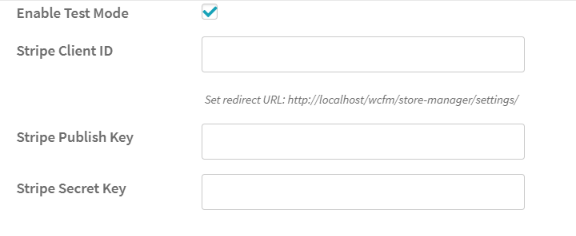
You may enable “Test Mode” for testing purpose.
2.2.1.Stripe Account Setup
Sign up or Log in
At first, you have to visit stripe.com and sign up. Follow their verification process. If you already have a Stripe Account, just sign in.
Generate (Test and Live) API Keys
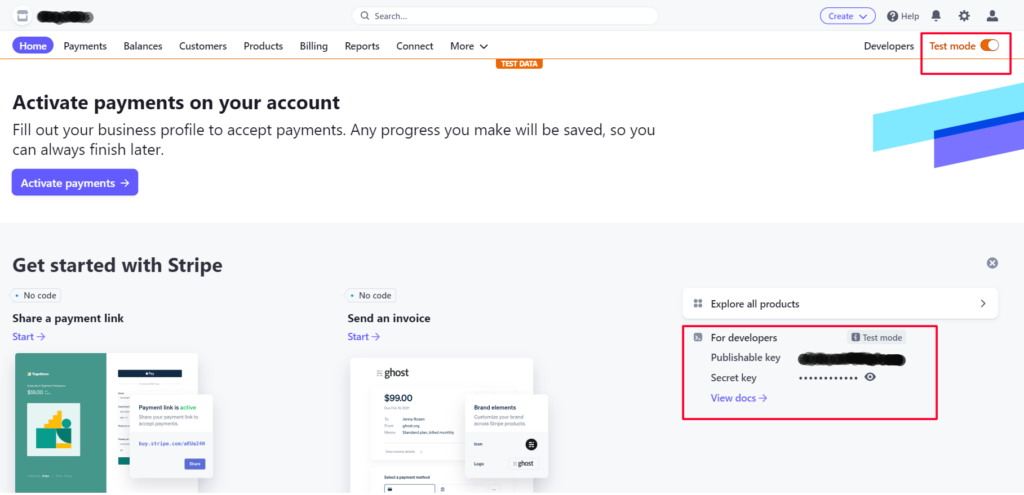
You should land on the Home tab after you log in to Stripe. If not, navigate to the Home tab of the Stripe logged-in interface to find the Secret and the Publishable Keys. The keys will appear based on what you select from the toggle button above. For example, if you activate the Test mode button, then the keys will show up for Test mode only. To view the live mode keys, simply turn off the toggle button for Test mode.
At the WCFM interface
Copy and paste the keys to the credential fields. If you are testing, use the Test credentials. For live transactions, use the live credentials.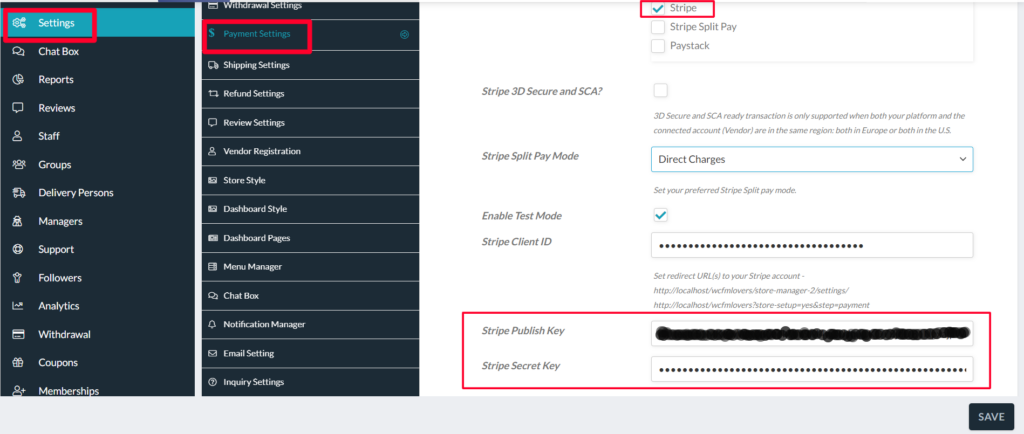
Connect Your Marketplace and Get the Client ID
Now that you have already entered the API keys and the only thing required is the Client ID for live transaction or Test Client ID for Testing.
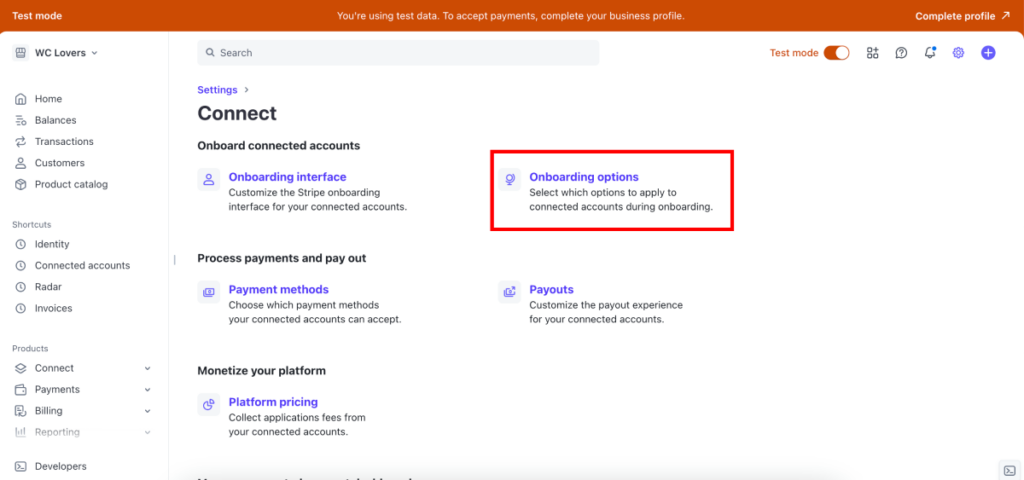
Click the settings icon from the top right hand side of the Stripe logged in interface, just beside the Profile icon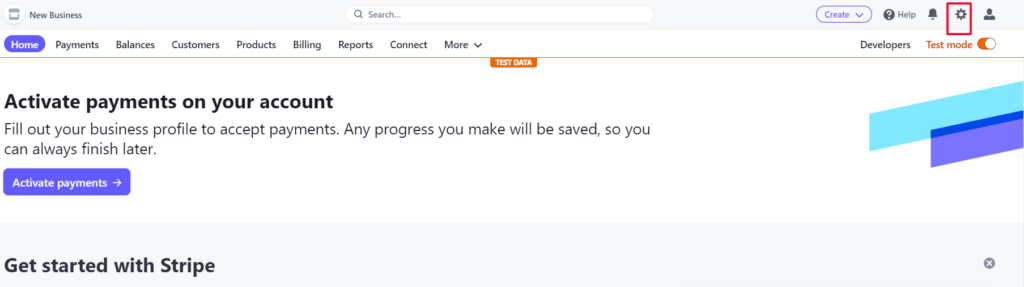
Click on the Connect link under the Product Settings section
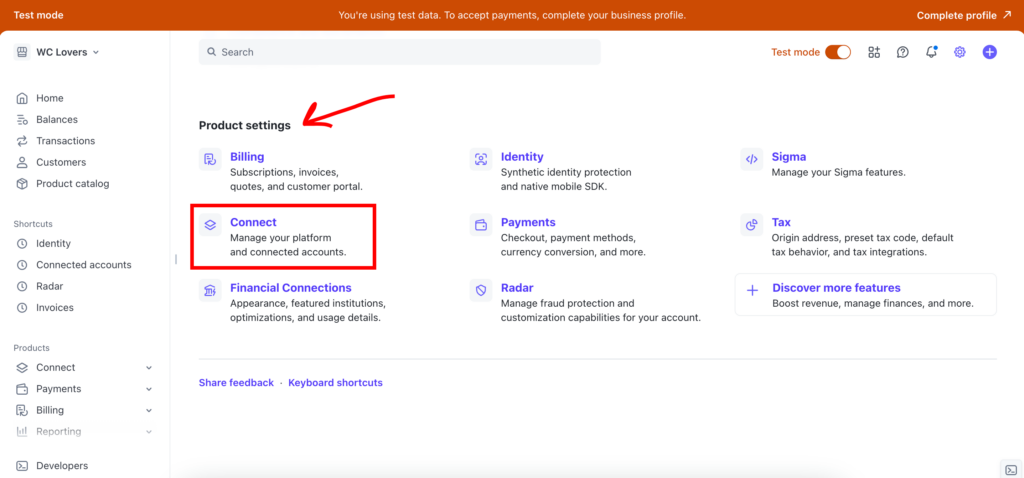
From the Connect settings page, choose the Onboarding options link.
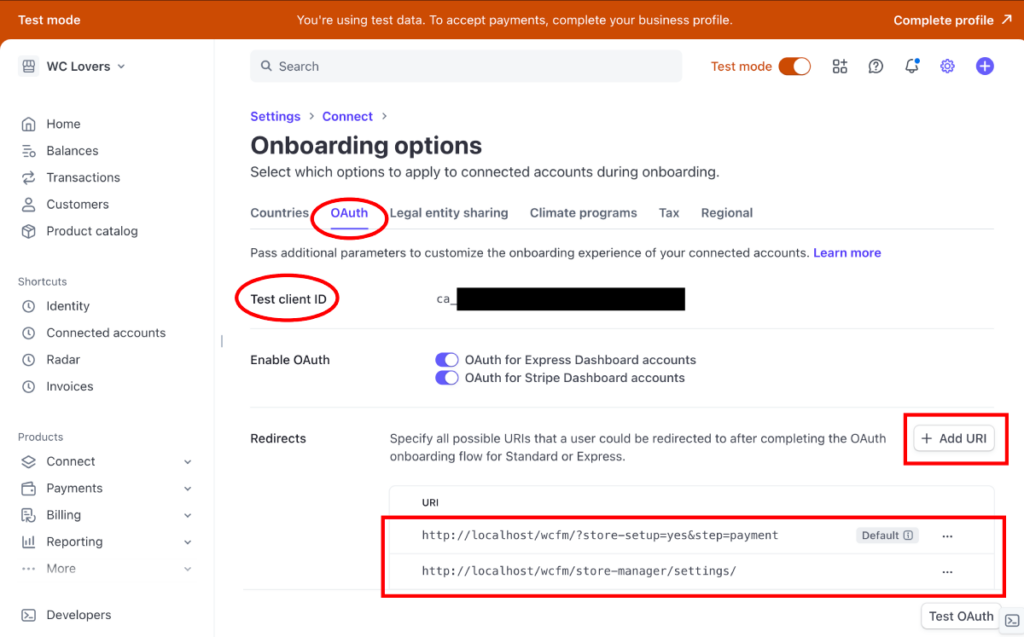
Click on the oAuth tab, and inside that, you’ll find the Stripe Client ID. This is the credential you have to put under the Client ID of the WCFM Payment Settings section. Also, copy the redirect URLs from the Payment Settings in WCFM, and add those to the Stripe interface under the Integration section (You have to set two URLs here – WCFM Dashboard page setting URL and for Setup Widget https://yourdomain.com?store-setup=yes&step=payment)
 Know more about this from here – https://www.appypie.com/faqs/how-to-get-live-publishable-key-live-secret-key-and-client-id-from-stripe
2.2.2.Vendor Stripe Connect
Vendors will have Stripe account connect option at their Store Manager -> Setting -> Payment -> Preferred Payment Method
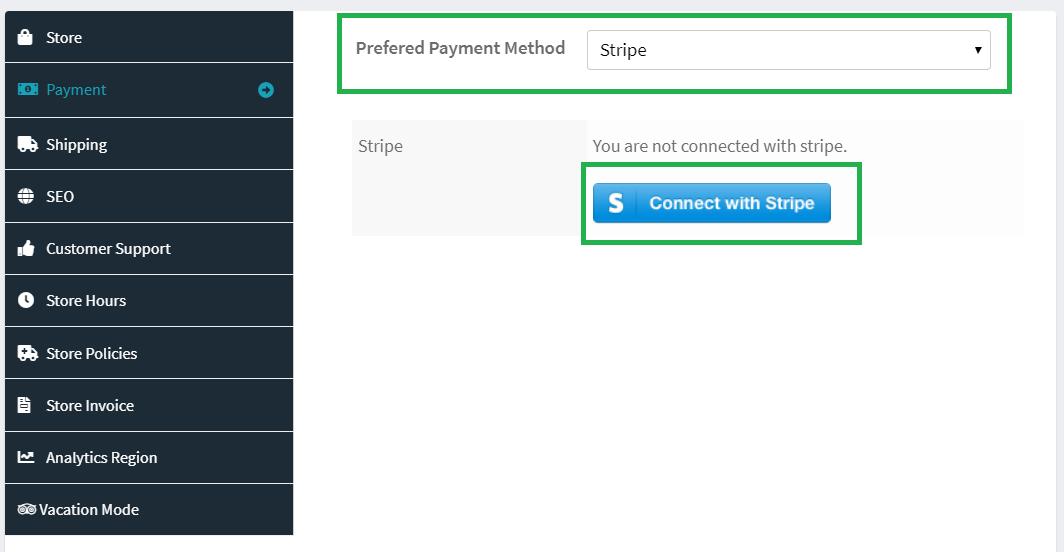
On click “Connect with Stripe” button vendor will redirect to Stripe site to connect their account with Admin’s stripe account –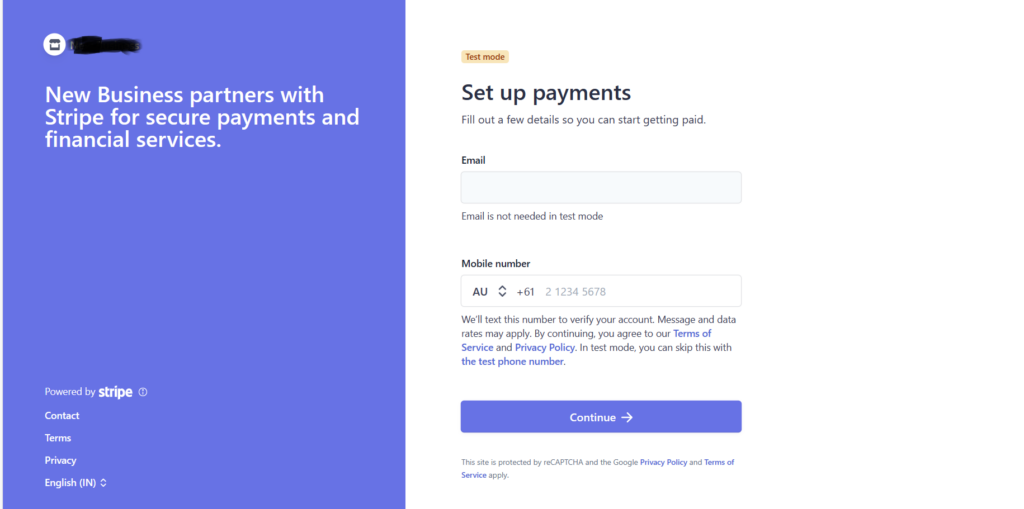
After successful connect vendor will redirect back to their dashboard payment tab and will see connect information.
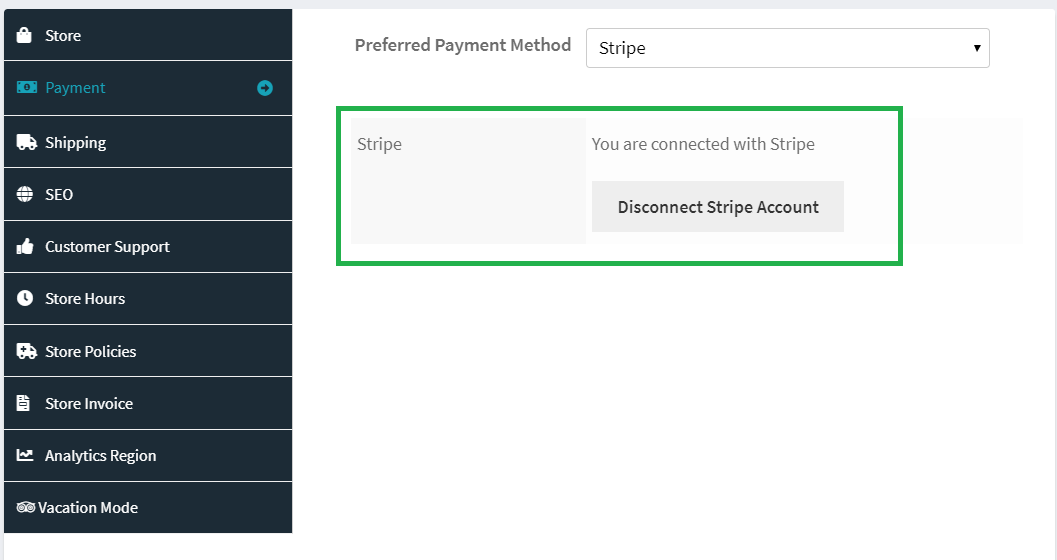
Vendors may disconnect their account anytime from here as well.
2.3.Stripe Split Pay
Stripe Split Pay is payment option using which you may pay vendors instantly, as soon as customer pay for the order. Total order amount divided into parts – vendor commissions and admin fee. Vendor commissions go into vendor stripe account and rest in admin’s stripe account.
Enable Stripe Split Pay from payment list and hence you will see Stripe configuration fields –
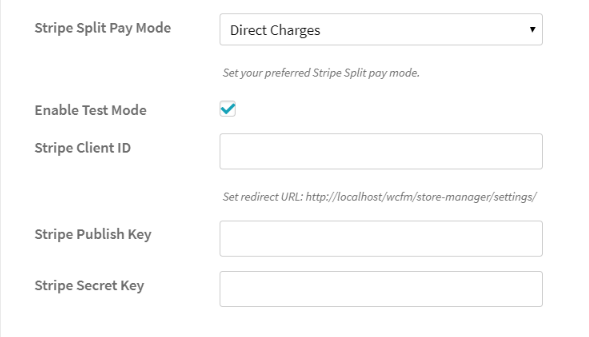
You may enable “Test Mode” for testing purpose.
Stripe has different type of charges/fees for Split payments –
- Direct Charges
- Destination Charges
- Transfer Changes
Know more about charges from here – https://stripe.com/docs/connect/charges
When you are using this payment method you do not require any other Stripe plugin for WooCommerce. It will work as Stripe payment gateway.
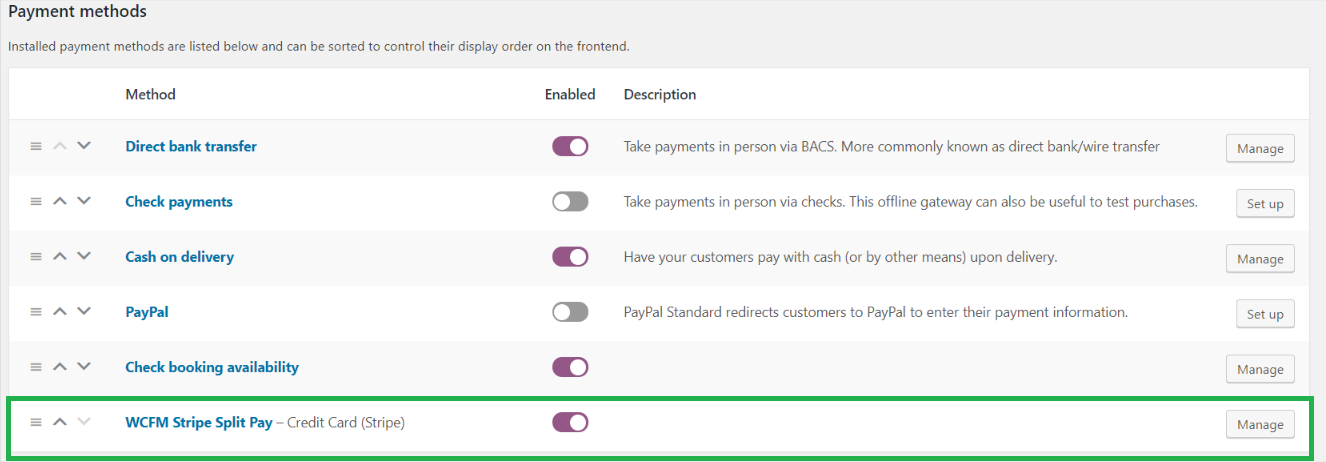
This will work as Stripe payment method at WC Checkout.
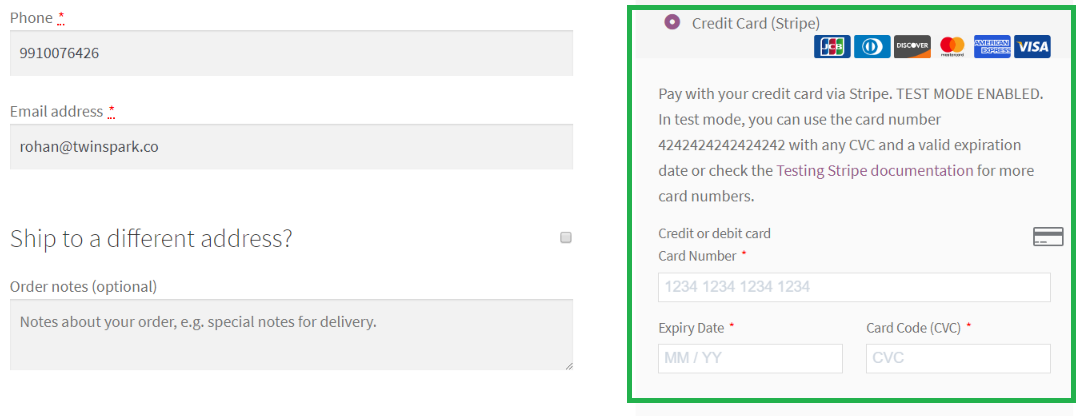
On successful payment order status change into “Processing”.
2.3.1.Stripe Split Pay Account Setup
Sign up or Log in
At first, you have to visit stripe.com and sign up. Follow their verification process. If you already have a Stripe Account, just sign in.
Generate (Test and Live) API Keys
You should land on the Home tab after you log in to Stripe. If not, navigate to the Home tab of the Stripe logged-in interface to find the Secret and the Publishable Keys. The keys will appear based on what you select from the toggle button above. For example, if you activate the Test mode button, then the keys will show up for Test mode only. To view the live mode keys, simply turn off the toggle button for Test mode.
At the WCFM interface
Copy and paste the keys to the credential fields. If you are testing, use the Test credentials. For live transactions, use the live credentials.
Connect Your Marketplace and Get the Client ID
Now that you have already entered the API keys and the only thing required is the Client ID for live transaction or Test Client ID for Testing.
Click the settings icon from the top right hand side of the Stripe logged in interface, just beside the Profile icon
Click on the Connect link under the Product Settings section
From the Connect settings page, choose the Onboarding options link.
Click on the oAuth tab, and inside that, you’ll find the Stripe Client ID. This is the credential you have to put under the Client ID of the WCFM Payment Settings section. Also, copy the redirect URLs from the Payment Settings in WCFM, and add those to the Stripe interface under the Redirects section (You have to set two URLs here – WCFM Dashboard page setting URL and for Setup Widget https://yourdomain.com?store-setup=yes&step=payment)
Know more about this from here – https://www.appypie.com/faqs/how-to-get-live-publishable-key-live-secret-key-and-client-id-from-stripe
2.3.2.Vendor Account Connect
Vendors will have Stripe account connect option at their Store Manager -> Setting -> Payment -> Preferred Payment Method
On click “Connect with Stripe” button vendor will redirect to Stripe site to connect their account with Admin’s stripe account –
After successful connect vendor will redirect back to their dashboard payment tab and will see connect information.
Vendors may disconnect their account anytime from here as well.
2.4.Payfast
To have Payfast payment gateway for your store you will need the followings along with WCFM Marketplace and WooCommerce:
- WCFM – Frontend Manager
- WooCommerce Payfast gateway
- WCFM-payfast addon ( from Git)
2.4.1.Payfast- Admin setup
Admin has to enable the payfast gateway from their own dashboard, they can do the same from here: Goto WCFM admin Dashboard-> Settings -> Payment settings-> Check Payfast option.
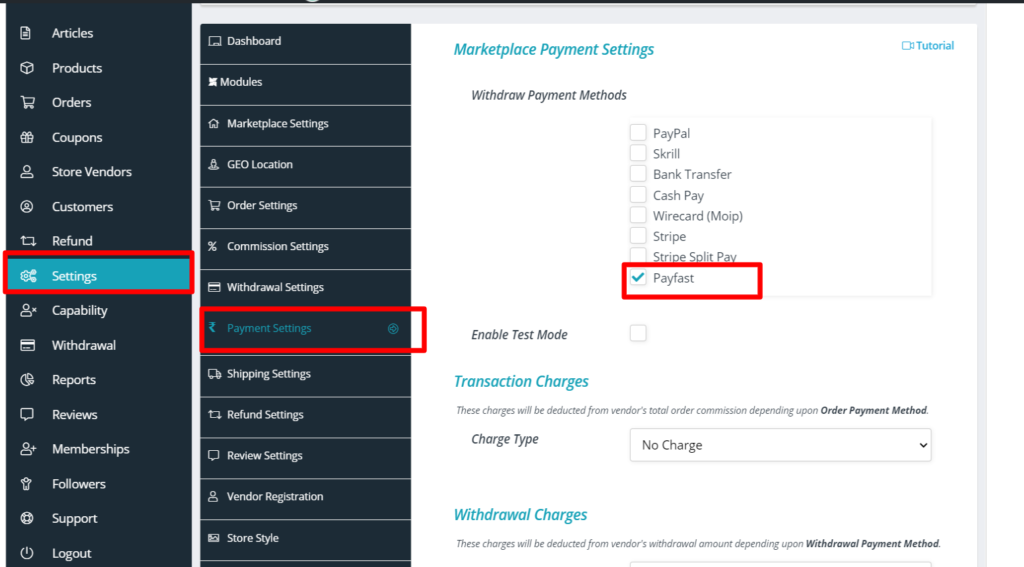
2.4.2.Payfast- Vendor Setup
Vendor’s will have to enter the merchant id of their Payfast gateway and select the preferred payment system as Payfast as shown below:
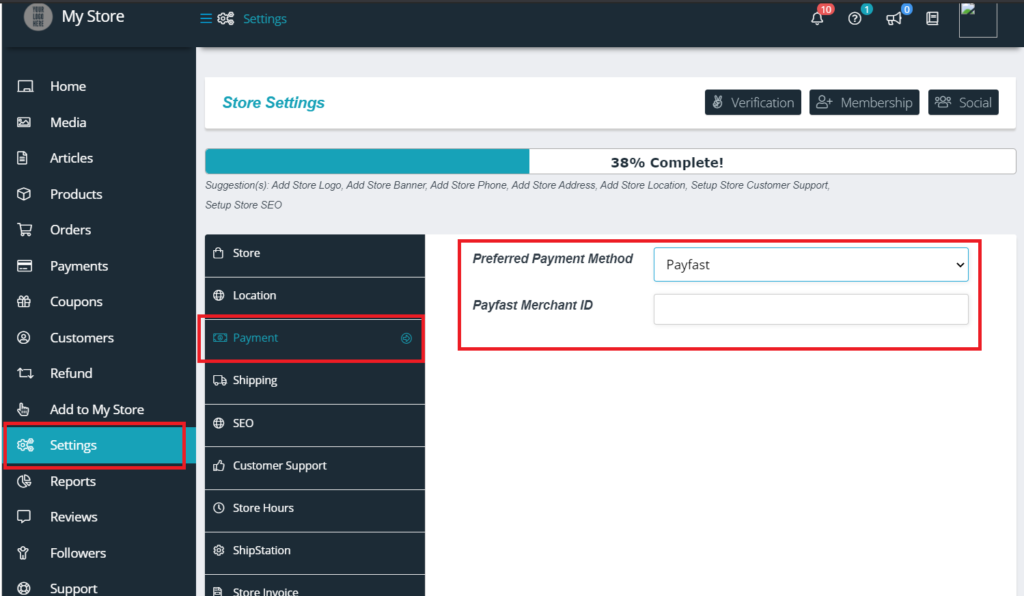
The above section can be navigated from here: Goto WCFM Vendor dashboard -> Settings -> Payment. Once this is done, the configuration of Payfast gateway is completed and vendors can receive payment using Payfast.
2.5.Paystack
To have Paystack payment gateway for your store you will need the followings along with WCFM Marketplace and WooCommerce:
- WCFM – Frontend Manager
- Paystack WooCommerce Payment Gateway
- WCFM Paystack Addon ( Github link)
2.5.1.Paystack- Admin setup
Admin has to enable the Paystack gateway from their own dashboard, they can do the same from here: Goto WCFM admin Dashboard-> Settings -> Payment settings-> Check Paystack option as shown below.
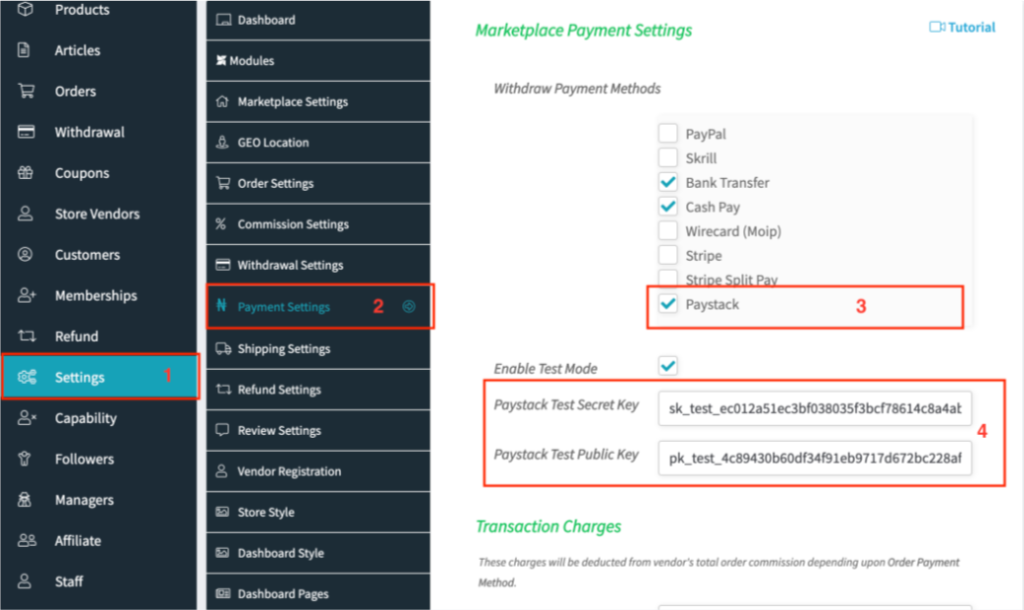
You will also have to place the Paystack Test secret key and public key as shown in the image above, check how to generate those keys from here
2.5.2.Paystack- Vendor Setup
In addition to admin, vendors will also have to configure their payment system accordingly, the vendors can do so from – WCFM Vendor Dashboard -> Settings -> Payments as shown below:
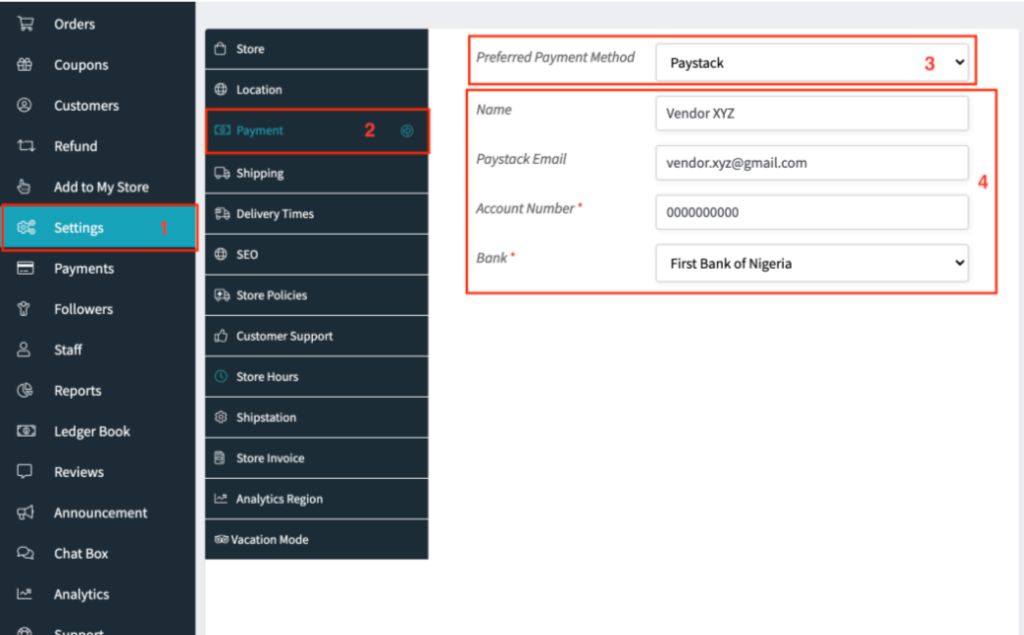
They will need to fill-up the necessary details and this will ensure that the amount gets paid through Paystack as required.
2.6.MangoPay
For MangoPay payment gateway in your store you will need the followings along with WCFM Marketplace and WooCommerce:
- WCFM – Frontend Manager
- MANGOPAY WooCommerce
- WCFM MangoPay Addon( Gitlab Link)
2.6.1.Mangopay- Admin settings
Admin has to enable the MangoPay option for his/her store and that can be done from payment settings as shown below from Admin Dashboard.
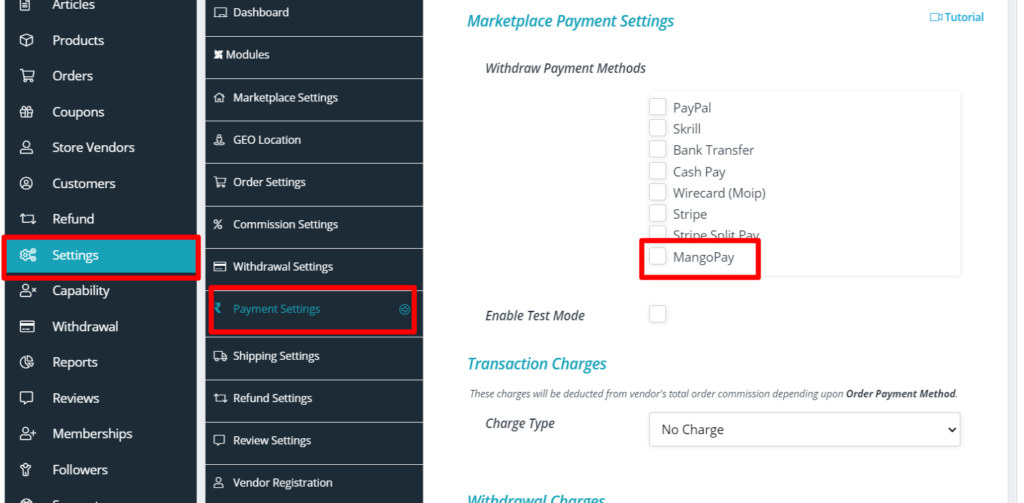
This will allow the vendors to setup MangoPay settings from their dashboard to accept payments.
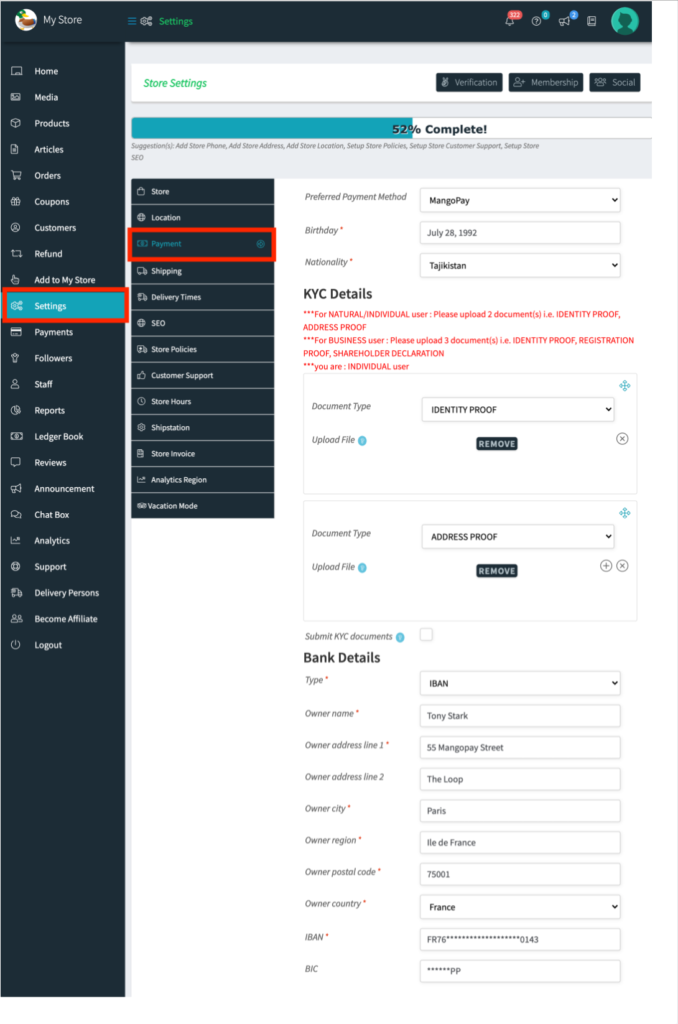
2.6.2.MangoPay- Vendor Settings
The vendors will also have to configure their Mangopay settings by entering details with few identity proves as shown below. This can be seen under payments option in settings menu of WCFM Vendor dashboard. Here’s a screenshot of the same along with details:
3.Manual Payment Methods
Manual payment methods are for transact payment manually from Admin account to vendors’ account. Here vendors may insert their account details for receiving payment but admin has to pay commission amount manually in vendors’ account.
Manual payment options –
- Bank Transfer
- Skrill
- Cash Pay